Matcha Chocolate Avo Buns

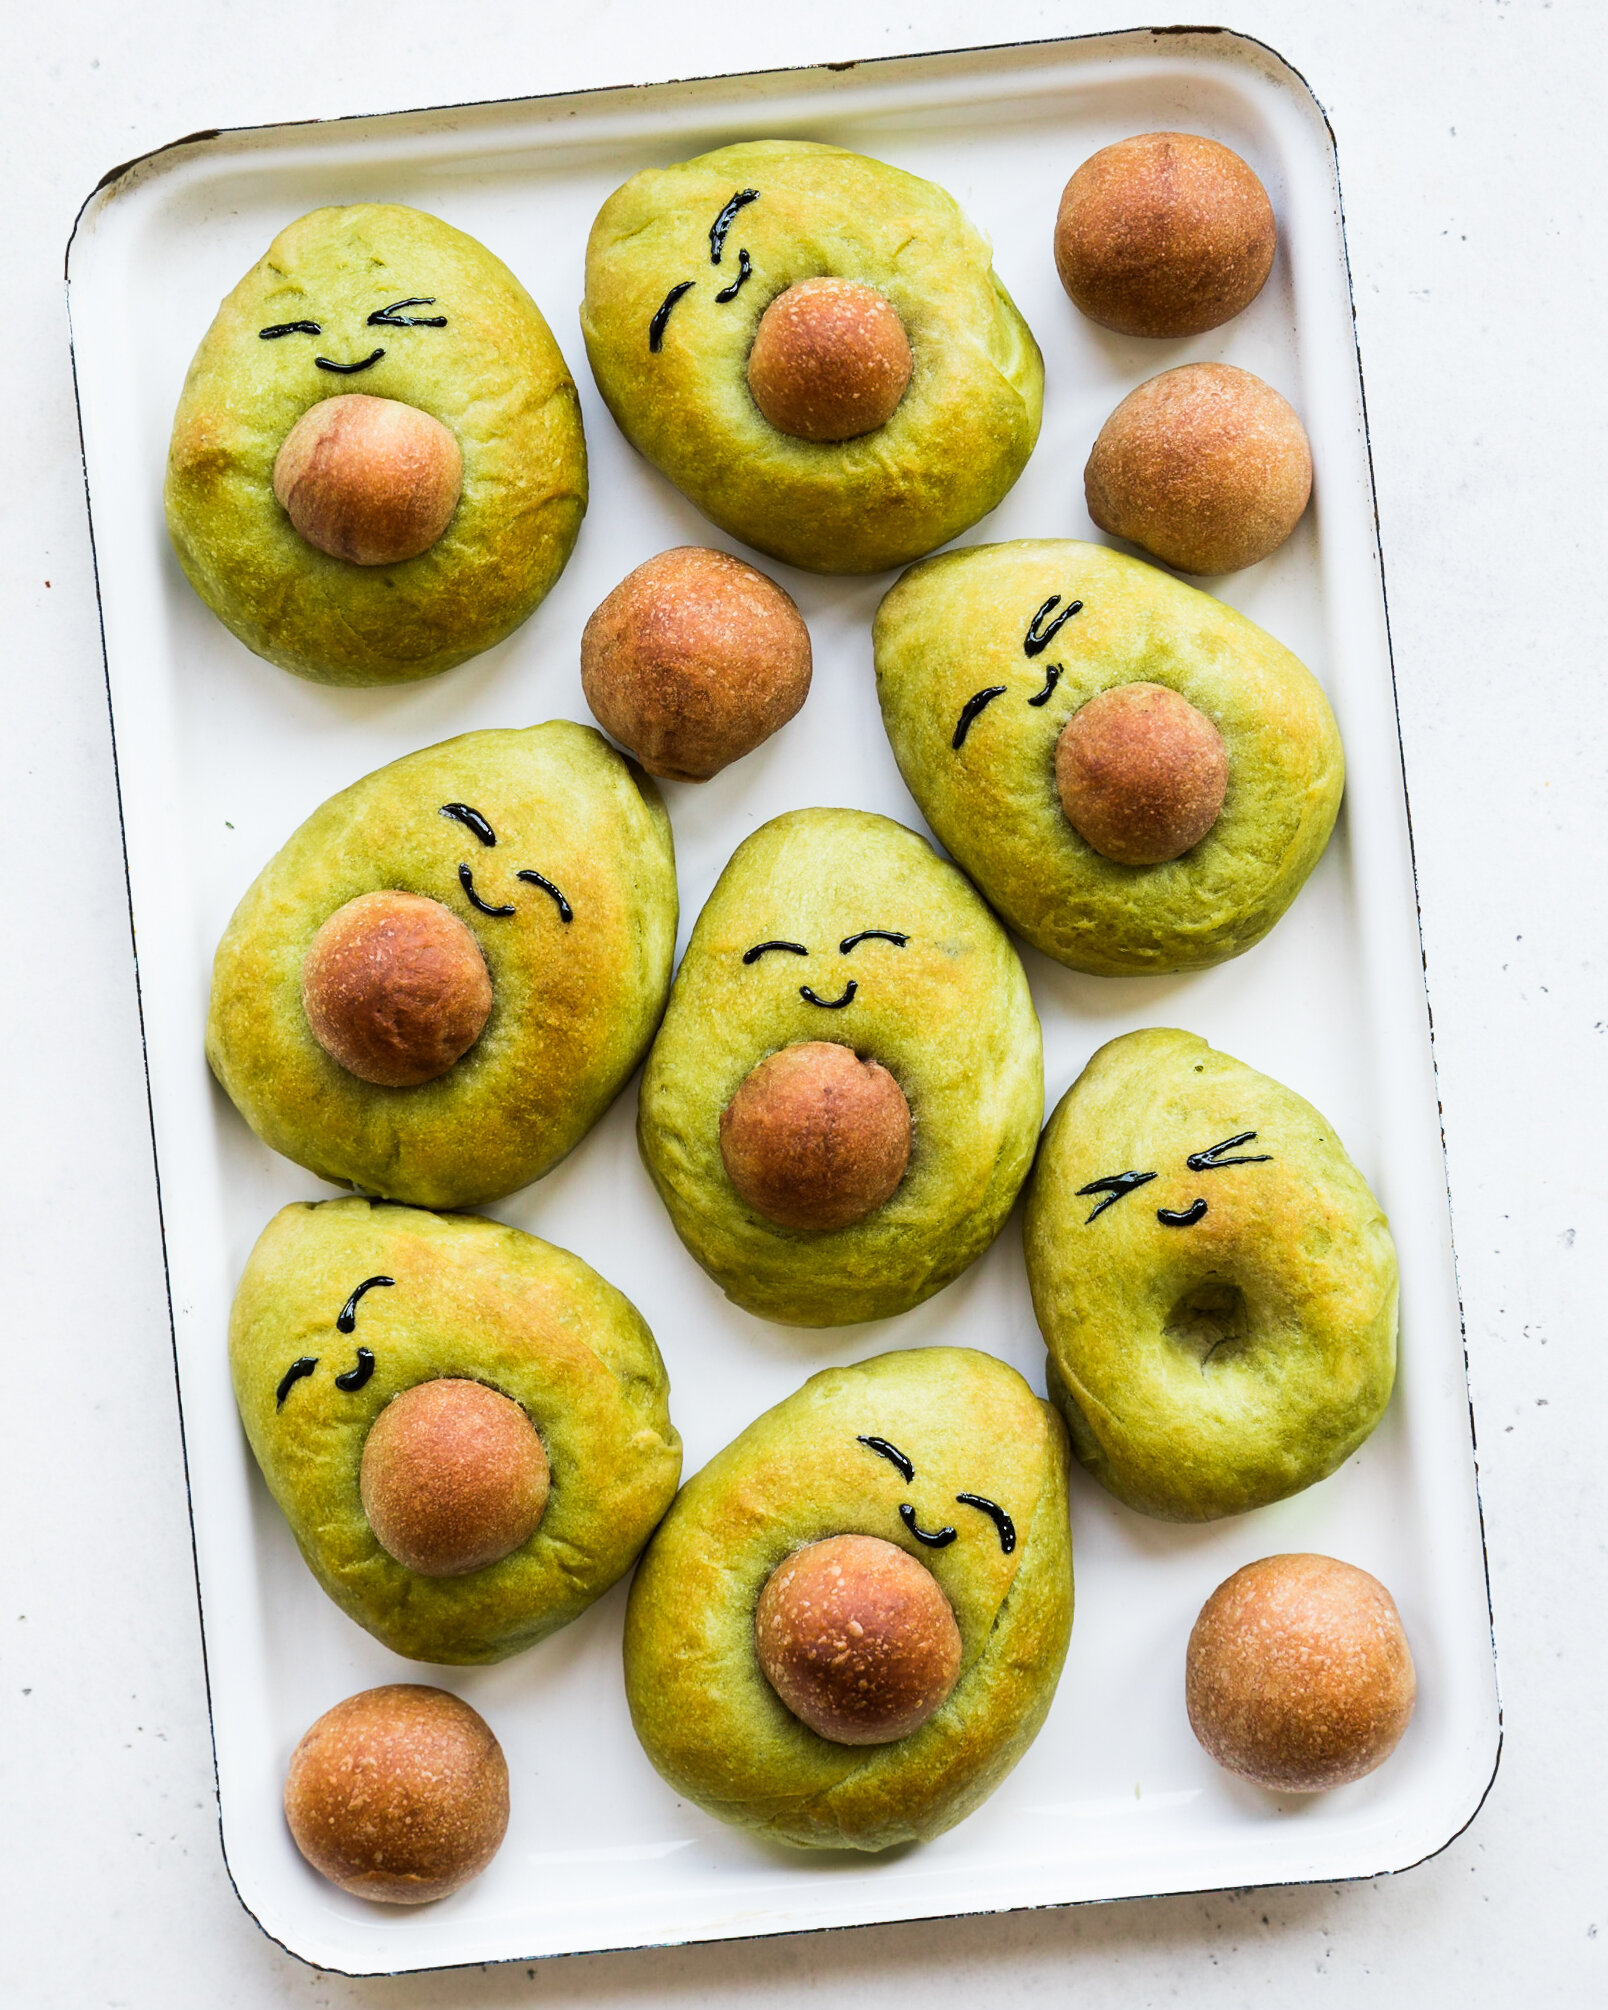
The cutest sweet buns with a slight taste of matcha and chocolate, shaped like everyone’s favourite veggie (that’s actually a fruit). Yes, these need a bit of time and effort - the dough is enriched so it rises more slowly than usual and you need to prove it twice. But when these sweet cuties come out of the oven - oh, it’s so worth it!!

avo buns-4.jpg


Ingredients

3/4 cup (175 ml) lukewarm unsweetened plant milk

2 1/4 tsp (1 standard packet, 7 grams) active dried yeast

1/2 cup neutral cooking oil, such as canola

1/2 tsp sea salt

1/2 cup  (100 grams) organic cane sugar

2 3/4 - 3 cups (400-450 gr) all purpose flour, as needed

Edible black paint, to decorate

For the matcha dough:

1 tbsp matcha + 1-1/2 tbsp milk

For the chocolate dough:

1 tsp cocoa powder + 1 tbsp milk

Method

  1. Add the lukewarm plant milk, yeast, oil, salt and sugar in a mixing bowl. Whisk until well mixed.

  2. Slowly add in flour until a dough forms. Once the dough has come together, use the dough hook to knead the dough with a stand mixed for 5-6 minutes or knead by hand on a well-floured surface for 8-10 minutes, until uniform and elastic.

  3. Remove a quarter of the dough and set aside. The large piece will be your matcha dough. Flatten the dough piece slightly and add the matcha and milk mixture. Knead until uniform, adding more flour as needed. Lightly spray a large bowl with oil, form the dough into a ball, and add to the bowl. Cover plastic wrap or a clean dish towel and let rise in a warm place for 1,5-2 hours, until the dough has doubled in size. The dough is done when you can push a finger into the dough and the dough does not spring back.

  4. To make the chocolate dough, flatten the dough pieces and add the cocoa powder and milk mixture. Knead until uniform, adding more flour as needed. Lightly spray a medium-sized bowl with oil, form the dough into a ball, and add to the bowl. Cover and let rise 1,5-2 hours, until the dough has doubled in size. The dough is done when you can push a finger into the dough and the dough does not spring back.

  5. When the matcha dough is ready, roll it into a log and cut into 10 even pieces. Shape each piece to the shape of an avocado and make an indent where the seed will be. Place on a baking tray covered with baking paper and cover with a plastic wrap or a clean dish towel.

  6. When the chocolate dough is ready, roll it into small golf-balls and place in the middle of the avocado buns where the indent is.

  7. Place the buns on a baking tray covered with baking paper and cover with a plastic wrap or a clean dish towel. Let rise for 30 minutes to 1 hours, until light and puffy.

  8. Preheat oven to 200C/400F. Bake the buns for 8-14 minutes, until lightly browned. Cool completely.

  9. Decorate buns with edible paint. Best kept in an airtight container and enjoyed within a day.

Vanilla Blueberry Baked Cheesecake

This cake, touted by my husband as the ‘‘best cake I’ve ever made’’ and requested as her birthday cake by my grandma, is honestly one of the yummiest things that has ever come out of my oven. With a soft, crispy crust, and a light cheesecake-y filling, it is the perfect sweet-but-not-too-sweet treat. And surprisingly simple to make!

It has quickly become a staple at our house, with topping variations from macerated strawberries to sautéed apples loaded with cinnamon. So if you’re looking for an easy but super delicious cake, this is most definitely it!

blueberry cheesecake.jpg


Vanilla Blueberry Baked Cheesecake

Serves 6-8

For the base:

2 cups plain flour

1/3 cup brown sugar

1/4 tsp sea salt

3/4 cup vegan butter or margarine, softened

1-2 tbsp cold water, as needed

For the filling:

8.8 oz vegan cream cheese, soy or oat-based

12 oz extra-firm silken tofu

1/2 cup brown or coconut sugar

1 tbsp lemon juice

2 tbsp cornstrach or arrowroot flour

2 tsp vanilla extract or paste

1/3 cup plant milk

Blueberry topping:

1 cup frozen wild blueberries

2 tbsp water

2 tbsp maple syrup

1 tbsp cornstarch or arrowroot starch


  1. To make the base, combine the flour, sugar, salt and butter in a food processor. Process a few times until well mixed. With the motor running, slowly add the cold water until the dough comes together and sticks when pressed between two fingers.

  2. Place the dough between two pieces of parchment paper and press down to create a flat dough circle. Place in the fridge for at least 30 minutes. 

  3. Preheat oven to 180C/350F. Line the based of an 8-or 9-inch/22 cm springform tin with baking paper. 

  4. Remove dough from the fridge. Roll it out so it it a bit bigger than your baking tin. Transfer dough to prepared baking tin and press firmly up the sides and bottom. Place in the fridge until needed.

  5. Make the filling by combining the cream cheese, silken tofu, sugar, lemon juice, cornstrach, vanilla and plant milk in a blender. Blend until very smooth, 1-2 minutes. 

  6. Pour into the prepared crust and tap lightly on the kitchen counter to release any air bubbles. Place in the oven and cook for 30-40 minutes. Remove from oven and cool completely, best overnight. The cheesecake filling will puff up quite a bit in the oven but it will deflate again as it cools. 

  7. When the cake is cool, make the blueberry topping by combining the blueberries, water, maple syrup and cornstarch in a small saucepan. Place on medium-high heat and bring to a simmer, stirring constantly, until the mixture thickens. Remove from heat and cool. 

  8. Spread the blueberry mixture on top of cake. Slice and serve. Enjoy!

blueberry cheesecake-2.jpg

Cinnamon Buns with Tahini Glaze

I don’t think there’s a single person out there who doesn’t love cinnamon buns. And the smell that fills the kitchen as they bake is almost reason enough to make these by itself! I have created many different types of cinnamon buns throughout the years but these are by far my favourite. There’s just something about the combination of fresh bread, cinnamon and tahini that wins my heart.

These buns are even more special since they include an edible souvenir I brought back from my recent food trip to Israel with Vibe Israel . You can read from my previous blog posts about all the amazing vegan restaurants we went to and the street food we ate, but on top of this we also visited the Al Arz tahini factory, which has some of the best tahini in the world (in my humble opinion :)).

It was a dream come true on so many levels - getting to taste hot tahini straight from the machine is something I’ll never forget. We got to see how tahini is made and bottled, taste different tahinis as well as pistachio and coffee halwa. And even though their tahini is SO GOOD that you can just eat it with a spoon, drizzle on veggies or mix with date syrup for a caramely sweet sauce, I had to create a recipe with it too as soon as I got home.

This recipe combines my love for cinnamon buns and tahini in a lip-smacking baked treat. I hope you love them as much as I do!

I am forever grateful for Vibe Israel for this eye-opening trip. You can follow their Instagram to see what else they’ve got going on - they organize exciting tours showing the best of Israel throughout the year!

  1. To make the dough, place the lukewarm milk, sugar, salt and coconut oil in a large bowl and mix until the sugar has dissolved. Add the yeast, then start adding the flour bit by bit until the mixture comes together. You may not need all the flour. 

  2. Dust a working surface and knead the dough for 6-8 minutes until uniform and springy. You can also do this with a mixer and dough attachment. Place the dough in a lightly oiled bowl and let rise for 1-2 hours in a warm place, until doubled in size. 

  3. While the dough is rising, make the filling by mixing together the vegan butter, brown sugar, ground cinnamon and cardamom. Set aside.

  4. Preheat oven to 375F/180C. Roll out the dough into a rectangle on a floured surface, the spread the cinnamon mixture on top. Roll the dough up, creating a cylinder, then slice crosswise into rolls. 

  5. Place parchment paper in a small baking tin and arrange the buns. Cook for 30-35 minutes, until lightly browned on top. Let cool. 

  6. Make the icing by mixing together tahini and icing sugar. Drizzle on top of the buns. 

  7. Best served when still warm. Enjoy!

Dough:

1 cup lukewarm unsweetened plant milk

1/3 cup brown sugar

1 tsp salt

1/4 cup melted refined coconut oil or vegan butter

1 tbsp fast action (instant) yeast

2 1/2 cups plain flour

Filling:

3 tablespoons vegan butter, melted

3/4 cup light brown sugar

1 ½ tablespoons ground cinnamon

1 tsp ground cardamom

Glaze:

2 tbsp runny tahini

1/2 cup - 1 cup powdered sugar

MUST-VISIT VEGAN RESTAURANTS IN TEL AVIV

As many of you know, I spent a full 10 days eating and drinking three times a day in Israel with VIBE Israel and four other vegan bloggers. It was the most amazing, eye-opening trip and I recommend everybody visits Israel ASAP! Because it was first and foremost a food tour, highlighting all the various aspects of Israeli cuisine (it is a melting pot of so many cultures!), we visited A LOT of vegan restaurants. And after the week-long trip was done, my hubsby met me in Tel Aviv and we continued on the hummus-and-falafel filled journey just the two of us.

Tel Aviv is widely considered the vegan capital of the world - by one estimate there are at least 400 vegan and vegetarian restaurants there. I thought that the food was very good in all the restaurants that I visited during my time there, but here’s a more compact list of great vegan restaurants (or regular restaurants with amazing vegan food) that I consider must-visits when in Tel Aviv:

416

416 is a restaurant that has it all - tasty vegan food (including the most incredible mock meats!), great, ambiance and very tasty cocktails. It is a mixture of American and Israeli cuisines and the result is mind-blowing!

Photo by Amir Menahem

Photo by Amir Menahem

Photo by Amir Menahem

Photo by Amir Menahem

OPA

This is one of the restaurants that surprised me the most. Vegan fine-dining with incredible flavours and textures! I love everything fermented and a lot of their savoury dishes had those aspects in them. But my favourite dish of the night was the chocolate and hazelnut dessert - to die for!

Photo by Amir Menahem

Photo by Amir Menahem

Photo by Amir Menahem

Photo by Amir Menahem

Green Roll Sushi

This is definitely not your average sushi. Firstly, because it is fully vegan and secondly, because it is definitely the most over-the-top sushi I’ve ever seen. Imagine maki rolls with crispy sweet potato crumbs and spicy vegan mayo, plated gorgeously with edible flowers. A veggie foodie’s dream!

green roll.jpg

Frishman Sabich

A few of you have already become aware of my love for this Tel Aviv street food through this blog post but if you’re in Israel then you have to try the one from Frishman Sabich. In addition to the sabich they also have falafel sandwiches and even a sabich-falafel combo. During my food tour of the city I tried a few different ones but this was definitely my favourite AND they have reusable metal plates for pickles, so they use less plastic!

Photo by Anett Velsberg

Photo by Anett Velsberg

Hummus Abu Hassan

This is a legendary hummus place among Tel Aviv locals - and for a good reason! Their fresh pitas, different types of hummus and sides are all super good. I loved their classic hummus the most, but the chunky and lima bean ones were very delicious as well. And you have to try eating the hummus with raw onion - it might seem weird at first (definitely was for me) but you don’t actually taste the onion that much, you just get the crunch from it :)

PS. You can buy the hummus & extras to go and sit on the bench next to the restaurant, overlooking Old Jaffa buildings and the sea in the distance. So lovely!

Picture by Anett Velsberg

Picture by Anett Velsberg

Hummus and Co. / חומוס ושות’

This quaint restaurant in Florentine is definitely worth a visit. Their falafels were the crispiest and lightest that I’ve ever tasted, which is why I’d go back there is a heartbeat. Their hummus, pickles and salads were also very tasty and the food itself was relatively inexpensive. The place had a huge line outside so it is obviously popular among locals too.

Picture by Anett Velsberg

Picture by Anett Velsberg

The Hebrew Bakery / המאפיה

We stumbled upon to this bakery completely by luck. They have a huge selection of vegan pastries - both sweet and savoury - and they are baked fresh throughout the day.

My favourite from the sweet ones was the rugelach (it was the only vegan one I saw during my time in Israel) but their jam - and halva-filled pastries were amazing too. From the savoury options I loved the vegan schwarma pastry - it had a bit of curry powder in it that made it very unique. Since our Airbnb was near this bakery, then we ended up coming here every morning for a coffee and a pastry. Heavenly!

Hamalabiya

A trip to Israel isn’t complete without a taste of their classic dessert - the malabi. It’s a creamy custard topped with rose syrup and crunchy bits, the perfect combination of Middle Eastern flavours and textures.

Hamalabiya has multiple restaurants around the city dedicated to this dreamy dessert (which they make completely vegan) but I also recommend trying the warm cinnamon-y custard called Sachlev (only served during winter) and their rose-flavoured beer, which is only sold on the spot.

Picture by Amir Menahem

Picture by Amir Menahem

Leggenda Ice Cream

Last but not least, I had to include an ice cream place in this list. Tel Aviv has very many ice cream shops that serve vegan scoops but I loved this one the most. They had a vegan ferrero rocher ice cream that tasted JUST LIKE THE REAL THING!

Photo by Anett Velsberg

Photo by Anett Velsberg

There are so many great vegan restaurants in Tel Aviv that this list is definitely not complete. If you have more time in Tel Aviv, I really recommend visiting Dilek’s Turkish Bakery for the vegan boreks, Meshek Barzilay and Anastasia for tasty vegan food and Zakaim for their hand-torn fried potatoes (among other things).

I am so thankful for Vibe Israel for inviting me out there to experience their amazing food scene. They organize very interesting tours throughout the year so make sure you check out their instagram to keep up with what they’re doing!

Raspberry Mousse Cake

I love a no-fuss cake recipe - and this is exactly it! Blitz together the base, blend the filling and refrigerate until set. Decorate and slice up. So easy! Not to mention that it is absolutely delicious, super fruity and can be changed up for any berries that you have. You can also play around with the toppings - vegan whipped cream is really delicious here too.

  1. To make the base, place the Graham crackers in a food processor and process until you get a fine crumb. Add the melted butter and process again until evenly mixed. 

  2. Press mixture to the bottom of the spring-form tin. Use the flat bottom of a glass to get it even. Place in the fridge until needed.

  3. For the filling, heat the coconut milk and agar agar in a small saucepan until boiling, stirring frequently. Boil for 20 seconds and then take off the heat.

  4. Pour the coconut milk-agar agar mixture into a high-speed blender and add the silken tofu, cream cheese, maple syrup and raspberries. Blend on high for 2-3 minutes, until very smooth, the pour onto the prepared base.

  5. Place cake in the fridge for at least 4 hours to firm up.

  6. Decorate with fresh berries and a few tablespoons of maple syrup.

  7. Serve immediately or refrigerate until needed.

For the base:

200 gr / 7oz vegan Graham crackers or Digestive biscuits (gluten-free if needed)

1/4 cup /60 ml melted vegan butter or coconut oil

For the filling:

400 ml/ 1 2/3 cups full-fat coconut milk

1 1/2 tsp agar agar

170 gr /6oz silken tofu

170 gr / 6oz vegan cream cheese

80 ml / 1/3 cup maple syrup or date syrup

250 gr / 8.8oz fresh or frozen and defrosted raspberries

For garnish:

250 ml / 1 cup fresh berries of choice

1-2 tbsp maple syrup

Sabich

Last week I got back from the trip of a lifetime - a vegan food tour in Israel with VIBE Israel, shared with four other vegan foodies like me. From the first day there I was taken aback with how much there is to see, and most importantly, how much there is to eat!

Even though there is no one specific Israeli food thanks to the mixture of cultures, much of the food they have is naturally vegan, such as every vegan’s favourites pita, hummus and falafel. On top of that, Israel has 5% vegans and 5-7% vegetarians, so there is a lot of demand for tasty vegan restaurants. There is also a vegan non-profit called Vegan Friendly that started out by getting restaurants to have more vegan meals on their menus and now also deals with labelling the products that are vegan (so that they’re easier to see in the supermarkets), organising animal rights marches and so much more!

During the week we tasted so much delicious food - from vegan Turkish boreks, to Arabic food to vegan fine-dining (stay tuned for a blog post on this topic!). But my favourite food was one of their street-food staples - the sabich. Imagine a freshly-baked soft pita bread filled with fried aubergine, salad, pickles and lots of tahini and sauces. SO GOOD! The traditional one they sell has eggs too but if you remove them then you’ll get a completely vegan, super delicious dish. I wish I could go back for more!

Because of this, the first thing I decided to cook for my fam when I got back was (my recreation of) a sabich. And, to my delight, it tasted pretty close to the real thing! I hope you try out the recipe I’ve created and love it as much as I do :) xo

Anett Velsberg.jpg

1. Arrange the sliced eggplants in a single layer on a large plate or platter and sprinkle lightly with salt.

2. Heat oil in a large skillet. Add the sliced eggplant and cook for 5-7 minutes on either side until golden brown.

3. Make the salad by combining the tomato, cucumber, onion, parsley, lemon juice, olive oil, salt and pepper in a bowl and mixing until combined. Set aside. 

4. Prepare the sauce by whisking together the tahini, water, lemon juice, salt and pepper until you get a smooth, runny sauce. Set aside.

5. To assemble, spread hummus, amba and schug in the pita. Add a few of the potato pieces to the bottom followed by the eggplant, salad, pickles and  tahini sauce. Sprinkle with kala namak for an eggy taste (if using). 

6. Repeat with rest of pitas and serve immediately. Enjoy!

Ingredients

1 medium-sized eggplant, cut into 1/4 inch thick rounds

1 tsp sea salt

3 tbsp canola oil

2 potatoes, peeled, cooked and roughly chopped

2-3 regular or wholewheat pitas, sliced at the top to create an opening

1/4 cup hummus

2 tablespoons amba sauce (optional)

1-3 tbsp schug other hot condiment like harissa, to taste

1/2 cup Israeli pickles

Pinch of kala namak (black salt) (optional)

For the salad:

1/2 cup diced deseeded tomato

3/4 cup diced Persian or English cucumber

1/4 cup diced red onion

1/4 cup flat-leaf parsley, finely chopped

1 tbsp lemon juice

1 tsp extra virgin olive oil

Sea salt, to taste

Black pepper, to taste

For the tahini sauce:

2 tbsp tahini

3 tbsp water

1 1/2 tbsp lemon juice

Sea salt, to taste

Black pepper, to taste

Make sure you check out VIBE Israel’s Instagram to stay in the loop with what they’re up to!

Anett Velsberg.jpg

Millionaire's Bars

An absolutely decadent three-layer dessert, that happens to be vegan & gluten-free! A crispy shortbread base, gooey caramel and a thin dark chocolate topping. The perfect combo!

For more recipes like this, check out my Deliciously Vegan iOS App or get a copy of my printable e-book!

millionaire's bars.jpg

Millionaire’s bars

Totao time: 3 hours 30 minutes

Makes 12-15 bars

Shortbread ingredients:

2 cups (230 gr) almond flour

1/2 cup (55 gr) coconut flour

1/2 tsp sea salt

1/2 cup (105 gr) vegan shortening

1/3 cup (70 ml) maple syrup

Caramel:

1 cup (240 ml) creamy almond butter

2 tbsp tahini

1/2 cup (120 ml) maple syrup

1 tsp vanilla paste

1/3 cup (70 ml) melted refined coconut oil

1/8 tsp sea salt

Topping:

200 gr dark chocolate, roughly chopped


Preheat oven to 180C/350F. Line a 9x9 square tin (or equivalent) with parchment paper and set aside.

Combine the almond flour, coconut flour, salt, shortening and maple syrup in a food processor and process until the dough is uniform and comes together. Press to the bottom of the baking tin and bake in the oven for 12-15 minutes, until browned. Cool completely.

Make the caramel by whisking together the almond butter, tahini, maple syrup, vanilla, coconut oil and salt. Pour on top of the shortbread and set in the fridge for at least 2 hours. 

Melt the chocolate in a bowl over a water bath and pour on top of the caramel. Place in the fridge until set, then cut into bars. Best kept in the fridge. 

Easy Apple Crumble

I love a quick, comforting dessert and this, still warm from the oven, with a scoop of vanilla ice cream is absolutely divine. It is super easy to make and you can swap the apples out for pears, peaches or even berries - what ever is in season! Check out the instructional video below!

For more recipes like this, check out my Deliciously Vegan iOS App or get a copy of my printable e-book!

Easy Apple Crumble

Serves 4

Total time: 50 minutes

Topping:

½ cup (50 gr) gluten-free rolled oats

1/2 cup (60 gr) almond flour

1/2 cup (65 gr) chopped pecans or walnuts

Pinch of salt

½ teaspoon ground cinnamon

3 tbsp maple syrup

1 tbsp melted coconut oil

Filling:

4-5 medium apples, peeled and thinly sliced (about 4 cups)

2 tbsp coconut or brown sugar

1/2 tbsp arrowroot or cornstarch

1 tsp ground cinnamon

2 tbsp maple syrup

Vanilla ice cream, to serve (optional)

  1. Preheat oven to 180C/350F. Lightly grease a small baking tin.

  2. Add all the topping ingredients to a bowl and stir until well mixed. Set aside.

  3. Add all the filling ingredients to the baking tin and stir until combined. Top with crumble at place in the oven for 30-40 minutes, until the apples are soft and the top has browned.

  4. Cool before serving. Best served with vegan vanilla ice cream.

 
apple crumble.jpg

Salted Cookie Dough Fudge

I love all salted desserts - the combination of sweet and salty is just so divine! Not to mention combined with dark chocolate and fudgy texture. SO good!

This recipe is gluten-free and vegan, whole ingredients (except for the chocolate), only 7 ingredients, ready in 1 bowl and less than 30 minutes (and just 10 minutes hands-on time!).

It serves as the perfect afternoon pick-me-up with a cup of coffee/tea/matcha and keeps in the fridge for up to a week. As if it will ever last that long!

If you are looking for more recipes like this, be sure to check out my Deliciously Vegan iOS App and my E-Book!

Salted Cookie Dough Fudge

Time: 30 minutes

Yields 14-18

1 block (2,82 oz/80 gr) dark sea salt/regular chocolate

1 cup (250 ml) unsweetened, runny almond butter

1/3 cup (80 ml)maple syrup

1/4 cup (60 ml)melted refined coconut oil

1 tsp vanilla paste or powder

1 cup (250 ml) gluten-free oat flour

1 tsp flaky sea salt (optional)


  1. Finely chop the chocolate. Set aside.

  2. In a medium-sized bowl, whisk together the almond butter, maple syrup, coconut oil and vanilla until smooth.

  3. Add the oat flour and mix with a spatula until even. Fold in the chopped chocolate.

  4. Line a 6x6 inch baking pan or equivalent with parchment paper. Press dough evenly into prepared pan and sprinkle on the flaky sea salt.

  5. Place in the freezer for 15-20 minutes or until firm.

  6. Remove from pan and slice into squares.

  7. Serve immediately or refrigerate until needed.

cookie dough fudge

Creamy Cashew Tomato Pasta

The creamiest, most divine pasta that comes together in less than half an hour! This is a weekly favourite at our house because it requires almost no time at all and EVERYONE loves it. Feel free to add any toppings too - baby spinach, sun-dried tomatoes and mushrooms are all delicious additions!

If you are looking for more recipes like this, be sure to check out my Deliciously Vegan iOS App and my E-Book!

Serves 4

Time: 20 minutes

1 lb / 450 gr pasta of choice, such as brown rice pasta

1 cup (250ml) raw cashews

3/4 cup (180ml) boiling water

1/2 cup (125ml) canned diced tomatoes

2 tbsp tomato paste

2 cloves garlic, roughly chopped

2 tbsp nutritional yeast (optional)

1 tsp maple syrup 

1 tbsp onion powder

Sea salt, to taste

Black pepper, to taste

1 tsp dried thyme

1-2 tbsp lemon juice (optional)

Large handful basil leaves, roughly chopped, to serve

 
  1. Cook the pasta in salted boiling water until al dente. Drain and set aside.

  2. While the pasta is cooking, add the cashews, water, tomato paste, canned tomatoes, onion powder, dried thyme, garlic, nutritional yeast (if using), lemon juice (if using), sea salt and black pepper to a high-speed blender and blend until very smooth. If you don’t have a high-speed blender then soak the cashews in hot water for at least 1 hour before blending.

  3. Add the sauce to the cooked pasta and stir until coated.

  4. Divide between bowls and top with chopped basil and a sprinkle of black pepper. Enjoy!

Easy Vegan Ratatouille

This is one of the easiest dishes you can make, full of flavour and nutrition! I make a big batch and eat the leftovers for days with pasta or rice or just as is. Drizzle a bit of pesto on top for some extra deliciousness!

Check the video for instructions!

If you are looking for more recipes like this, be sure to check out my Deliciously Vegan iOS App and my E-Book!

Time: 60 minutes

Serves: 4-6

2 tbsp refined coconut oil

1 large onion, chopped

2 garlic cloves, minced

3 cups (750 ml) diced (canned) tomatoes

2 tsp dried oregano

1 tsp dried thyme

Sea salt, to taste

Black pepper, to taste 

Large handful of fresh basil, roughly chopped

2 medium-sized eggplants, thinly sliced

2 zucchinis, thinly sliced

2 yellow squashes, thinly sliced

2-3 red bell peppers, thinly sliced


  1. Preheat oven to 350F/180C.

  2. Heat oil in a large skillet. Add the onion and cook for 3-5 minutes, until translucent. Add the garlic and cook for a further 2-3 minutes.

  3. Add the tomatoes, oregano and thyme. Lower the heat and cook for 10-15 minutes, until thickened.

  4. Add the sea salt, black pepper and basil. Remove from heat and ladle into a round baking dish.

  5. Arrange the vegetable slices on top in any pattern you wish. Sprinkle with herbs, salt and pepper.

  6. Cover with foil and bake for 50-60 minutes, until the vegetables are tender.

  7. Let cool a bit and serve.

ratatouille-2.jpg

2-Ingredient V/GF Sweet Potato Pizza

I have been ultimately slack in updating this blog, so I’m finally posting another recipe! A vegan and gluten-free pizza dough that is FULL of goodness and only takes 2 ingredients. Kinda hard to believe, I know! This dough can also be rolled out and cooked on a non-stick frying pan for excellent flatbreads. Eating these with hummus is heavenly!

So without further ado, here’s the recipe that we’ve been making on repeat for the past two weeks!

If you are looking for more recipes like this, be sure to check out my Deliciously Vegan iOS App and my E-Book!

Sweet Potato Pizza

Method

  1. Preheat oven to 200C/400F. Line a baking sheet with parchment paper.

  2. Make the dough by mixing together the sweet potato puree, oat flour, sea salt and oregano until you get a firm dough. The dough should not be sticky at all - if it is then add a bit more oat flour.

  3. Divide the dough into 2 or 3 depending on how many pizzas you want and roll out on a floured surface, the transfer to the oven and bake for 10 minutes.

  4. Remove the dough from the oven and add the marinara and your toppings of choice. Bake for another 10-15 minutes, until the dough is crisp an slightly browned and the toppings are cooked through.

  5. Best served immediately.

Ingredients

this makes 2-3 pizzas

2 cups (500 ml) sweet potato puree

2 cups (500ml) wholegrain (gluten-free) oat flour

1 tsp sea salt

1 tsp dried oregano (optional)

Toppings:

1 cup (250ml) marinara sauce

3-4 mushrooms, thinly sliced

4-5 cherry tomatoes, thinly sliced

handful of fresh basil, for serving

other topping options: red peppers, zucchini,

olives, capers, vegan cheese, etc.

This dough keeps in the fridge for 3-4 days and is excellent for flatbreads too!

Vegan Lemon Poppyseed Muffins

Muffins have always been my favourite go-to, quick baked treat. These ones come together so quickly and they have a wonderful tangy flavour. Combine that with poppy seeds and you've got yourself a real winner! 

When I was growing up the poppy seed rolls were one of my favourite baked treats. I haven't eaten one in years now but baking anything with poppy seeds reminds me of a simpler time when young Anett could easily eat one or two of those pastries a day straight from the bakery. Those where the days, eh?

Lemon poppyseed muffins

If you want more delicious vegan baked treats and other recipes then check out the Deliciously Vegan App - there's over 200 recipes there already and counting! Over the past months I've put most of my emphasis on creating more recipes for the app, and to be completely honest, this blog as been left a bit on wayside. But I am working on new recipes for you my blog peeps now, so hold tight!

Ingredients

makes 6 big or 9 small muffins

  • 2 cups plain flour

  • 2 tsp baking powder

  • ¼ tsp baking soda

  • 3 tbsp poppy seeds

  • 1/2 tsp powdered vanilla (sub vanilla extract)

  • 1/2 cup + 2 tbsp organic brown sugar or coconut sugar

  • 1/2 tsp salt

  • 1/3 cup melted vegan butter or avocado oil

  • zest & juice of 1 lemon

  • 1 cup soy milk

  • 1 tsp apple cider vinegar

for the glaze:

  • ¾ cups powdered sugar

  • 1-2 tbsp fresh lemon juice

Method

Preheat oven to 180C. Line a cupcake tray with muffin liners.

In a medium sized bowl, combine the flour, baking powder, soda, poppy seeds, vanilla, sugar and salt. Mix well.

In another bowl, combine the melted butter, lemon juice, soy milk and apple cider vinegar. 

Add the wet ingredients to the dry ones by folding the batter gently until smooth and incorporated. Spoon into cupcake liners and bake for 15-20 minutes, until a toothpick inserted comes out clean. Let cool completely before icing.

To make the icing, combine the powdered sugar and lemon juice until you reach the desired consistency. Pour over muffins. Enjoy!

vegan muffins

Cape Town's Hidden Gems

After nearly 3 years of living in Cape Town, I've finally gathered an appropriate amount of information to write a 'Things To Do' list. I've chosen to avoid the regular tourist hotspots (Camps Bay, Lion's Head, Promenade, V&A Waterfront, Cape Point, Boulder's Beach etc etc) and bring to you some of the perhaps less well-known but in my mind, even more amazing sights. And although I feel that there is way more still to discover, here are some of my favourite things to do! 

  • Table Mountain

Although I said that I wouldn't include any of the ones that are on everyone else's list, this is the one exception. Whether you hike up there or take the cable car, this is definitely one of the must-dos in Cape Town. I've been up there a number of times and can safely say that the view never ceases to amaze me.

The best way to see the mountain is by hiking up - take the Skeleton Gorge route from Kirstenbosch. You get to see some of the most amazing nature going up - from waterfalls to rivers on the top with orchids growing around them - as well as getting a nice workout! The start of the hike is pretty steep so consider taking it slow, especially in the heat (thankfully the path is shaded most of the way). Once you reach the top however, it is quite an easy trek to the other side where you can catch a cable car down (or hike down if you legs can still carry you). The trip up takes about 3-4 hours, walking at a medium pace. If you are thinking that a hike may be too much for you then I can safely say that once you are on top of the mountain, you will absolutely not regret taking the long way up.

I should also mention here that hikes around Cape Town should ideally have their very own section on my blog - it is my favourite way to spend Sundays and see the beauty that this area has to offer! If you are interested in hikes in and around Cape Town, then this is quite a good article to browse through.

  • Chapman's Peak drive

Although this isn't a 'thing to do' per se, it would be really sad if somebody came to Cape Town and missed this beautiful drive. It starts from Noordhoek and ends in Hout Bay (or the other way around) and has some of the most beautiful views in the area. I love taking snacks with me and sitting on the edge of the rocks while watching the sun go down  -  truly magical!

The Chapman's Peak hike is also worth doing - it is moderately difficult but has the most superb 360 degree views on the top!

Chapman's Peak

This gorgeous nature reserve has a huge dam that you can hop into to cool down and is encompassed by one of my favourite hikes in the area - the path to the Elephant's Eye Cave. It is an easy walk/hike with only the final bit up to the cave being a bit more tricky but the views are absolutely worth it! The cave is huge and it is the perfect place to have a picnic and enjoy the views. 

Elephant's Eye Cave

  • Clarence drive/R44 from Gordon's Bay to Hermanus

This is one of the most gorgeous scenic drives in the Cape and is dotted with many beautiful beaches, whale-viewing sites (it is the start of the Whale Route!) and a penguin colony at Betty's Bay that is much better in terms of non-smelliness and tourist-trapness than its companion Boulder's Colony in Simon's Town. Not to mention that the route ends with Hermanus which is a beautiful town in its own right, with amazing whale watching opportunities and really beautiful wine estates!

  • Kalk Bay

Kalk Bay and the neighbouring St. James are lovely little seaside villages. We often go there for a slow stroll on weekends - there are street stalls, quaint boutiques, colourful boats, good food and an abundantly welcoming atmosphere all round!

Seal Island is definitely something that needs to be seen to be appreciated - home to over 60 000 cape fur seals, big ones and babies alike, it isn't as much an island as it is a big rock. The ferry costs around R100 and starts from Hout Bay Harbor - there are lots of boats to choose from, all working around the clock (daylight hours), and the trip lasts about an hour. You're guaranteed to see so many cute seals and if you're lucky you might even spot some whales or dolphins too!

Seal Island

There are quite a lot of markets in the general Cape Town area all through the week, so I've chosen to highlight my favourite, The Oranjezicht Market, which takes place every Saturday, rain or shine, from around 8:30am to 2pm near the V&A Waterfront. They've got amazingly fresh local produce for sale, really nice food for vegans and non-vegans alike, and a really nice atmosphere for just taking it slow on a Saturday morning. 

Be sure to get one of the olive sticks from Woodstock bakery and the red lentil hummus from Aramoun!

  • Llandudno beach

You can't get around coming to Cape Town without seeing and spending some time at one of its numerous beaches. There are quite a few really nice ones, but our favourite is Llandudno beach. It's just a short drive away from Camps Bay towards Hout Bay, and is the perfect amount of hidden while still playing host for enough people to not feel too secluded.

Llandudno
  • Wine tasting

If you know anything about Cape Town, it wont come as a surprise that there are some excellent wines to be had in the Western Cape. There are so many places in the area that the list could very easily go on for pages, so I've narrowed it down to three:

- Uva Mira Mountain Vineyards - Set on the high slopes of the Helderberg Mountain Range, about a 15 minute drive from Stellenbosch, Uva Mira's grapes are grown at quite a high altitude compared to other places in the region, giving their wine an outstanding taste - in my humble option at least. I've been there too many times to count over the past years, enjoying their amazing wines and equally spectacular views.

- Cape Point Vineyards - This wine estate has really good wines, nice views and a lovely atmosphere, given that the restaurant and tasting area is situated around their very own reservoir. Get some wine and pull up a blanket on the grass for an impromptu picnic.

- Beau Constantia - Another really lovely setting, this vineyard estate has amazing wines and exceptional views. They've also got a top-notch restaurant there - Chef's Warehouse Beau Constantia - that is well worth a visit! Be sure to make a booking ahead of time though, as they're often full. 

Babylonstoren is an Old Dutch farm with amazing restaurants, a huge garden in which they grow all of their own fruits and veggies, highly respected wines, a beautiful farm stall and luxury accommodation. I feel like this paragraph is not nearly enough to put in words how much I love this place - you can read more about it in the blogpost that I wrote here

Finally, you absolutely must pay a visit to this awesome deli shop run by an effortlessly astute and always-smiling sister/brother duo. They have an exquisite selection of both South African and international goods, all hand-picked by them, including lots of vegan stuff! They've even got vegan croissants and donuts there if you are lucky (although they sell out really fast!).


There is definitely lots more to see and do around Cape Town that isn't on this list. I feel like I should write down everything, while at the same time keep it compact and readable. Is it even possible to do both? In any case, check back here soon to see if I've added another not-to-miss activity to this list!

Vegan blueberry latte

A beautiful, fruity latte, perfect for winter and summer alike. 

Summertime in Nordic countries means two things - slightly warmer weather than the rest of the year and an abundance of things to forage in the forests. Mushrooms and berries, most importantly. 

This recipe highlights my favourites - wild blueberries or bilberries. They've got so much flavour and punch packed into a small round package, it's impossible not to love them! In summer we usually freeze as much as we can for the winter ahead, perfect for making these lattes later in the year!

If you can't find bilberries then regular blueberries will work just as well! Living in South Africa means that there are no bilberries here, which is why I've used regular blueberries for these pictures too. It tastes really amazing!

10 minutes

for 1-2 people

Ingredients

3 heaped tbsp blueberries, fresh or frozen

1 1/2 cup plant milk (oat/almond milk is best) + more for foaming

1/2 cup water (optional)

1-2 berry tea bags (rooibos works well too)

1 tsp powdered vanilla (sub with vanilla extract)

1/2 tsp cinnamon

1/2 tsp cardamom

 Place all ingredients in a small saucepan and bring to a simmer. Turn the heat off and let infuse for 5 minutes, then remove the tea bag and pour into cups. Foam the milk by placing a few tbsp in a French press and moving the handle up and down. Pour on top of the latte and sprinkle cinnamon on top. 

Oyster mushroom maki rolls

Every Saturday there is an organic market in Cape Town called the Oranjezicht City Farm Market. We go there as often as we can, stocking up on vegetables and fruits of the season as well as some of the most beautiful mushrooms our eyes have ever seen - including the beautiful pink oyster mushrooms used in these rolls.

They have a wonderfully delicate flavour, ready to be enhanced by whatever you with to cook it with. My favourite additions are simple - a bit of tamari, a bit of mirin, and sesame oil. Wonderful with noodles and rice alike!

We often sautee the oysters, julienne a variety of vegetables, and put the combination into wonderfully textured vegan maki rolls (as you might have heard, my husband loves anything and everything Japanese, including copious amounts of sushi rice each week).

As with any of my recipes - use the filling as more of a guideline and substitute the vegetables and mushrooms with whatever you have in your pantry. 

Ingredients

For the rice:

3 cups/555 gr of sushi rice

700 ml water

1 ribbon of kombu (optional)


For the sushi seasoning:

90 ml sushi rice vinegar (Mizkan works very well)

2 tbsp of sugar

2 tsp of salt


For the mushrooms:

1 tbsp toasted sesame oil

1 garlic clove, finely chopped

1 tbsp mirin

1 1/2 tbsp tamari

1/2 tbsp maple syrup

200 gr oyster mushrooms, roughly chopped


for the filling:

1 carrot, julienned

50 gr of purple cabbage, julienned

3-4 pieces of tenderstem broccolini (optional)

1 large avocado, thinly sliced


Extras: 

4 nori sheets, more if needed

black and white sesame seeds, for garnish

tamari or soy sauce, for dipping


Method

Wash the rice in a sieve under cold water until the water runs clear. Place the rice in a pot with the water and soak it for 30 minutes. 

Put the pot, lid off, on a high heat until it starts to boil, stirring gently every 2-3 minutes with a wooden spoon. Once it starts boiling, cover the pot with a lid and turn the heat down to the lowest. Cook covered for 8-10 minutes, until all the water has been absorbed and rice grains fat shiny. Turn the heat off and place a towel over the top of the pot so that no steam escapes. Leave to steam for 15 minutes.

 While the rice is steaming, make the sushi seasoning. Heat all the ingredients in a small saucepan over low heat, stirring until the sugar and salt have dissolved. Be careful not to boil. Let cool once once. 

When the rice is ready, gently spoon it into a wide bowl (wood or plastic, not metal) with a wooden spoon/spatula and pour the sushi seasoning over it evenly. Fold the rice gently to incorporate the seasoning and cool the rice. 

For the mushrooms, combine the sesame oil, garlic, mirin, tamari and maple syrup in a bowl and add the chopped mushrooms. Let marinate for 5 minutes, then cook on a medium heat until soft and caramelised, 5-7 minutes. Leave aside.

To make the rolls, place a nori sheet on a bamboo rolling mat, shiny side on top. Cover the nori with rice, using wet hands, leaving 2 cm empty on the top.  I keep a bowl of cold water near as I roll to make the process easier. 

Arrange the vegetables and mushrooms in a line near the bottom of the sheet and roll up tightly, wetting the empty nori at the top so that it sticks together. Repeat with rest of nori sheets and vegetables, then cut the rolls into pieces and sprinkle sesame seeds over. Serve with tamari for dipping. 


Vegan banana chocolate chunk muffins

Fluffy muffins, sweet banana & slightly bitter chocolate chips. Ready in next to no time and perfect with a cup of tea or coffee.

This muffin recipe is another one made with the magic of aquafaba aka chickpea water. It is best to use a can of good quality organic chickpeas (make hummus from those!), drain into a jar and keep in the fridge. You can also freeze it in ice cube trays to use whenever you need it!

I find that the combination of banana and aquafaba creates the most perfect moist muffins, which is why I come back to these again and again. I've also added walnuts and blueberries to the mix and it tastes amazing! So feel free to play around. 

Vegan banana muffins

Vegan banana muffins

Ingredients

2 small ripe bananas

3 tbsp aquafaba

3 tbsp almond milk 

3 tbsp maple syrup

2 tbsp almond butter

1/2 tsp salt 

2 tbsp coconut oil, melted

1 cup plain flour

1,5 tsp baking powder

1/2 tsp pure vanilla extract or vanilla powder

40 gr dark chocolate, roughly chopped or dark chocolate chips

Method

Preheat oven to 180C. 

Combine the bananas, aquafaba, almond milk, almond butter, salt and coconut oil in the jug of a blender and blend until smooth. 

In a large bowl, combine the flour, baking powder, vanilla and and dark chocolate chunks/chips. Fold in the wet ingredients until you get a smooth consistency. Line a muffin tray with cupcake liners and scoop the batter into the pan. Bake for 20-25 minutes, until browned on top and a toothpick inserted comes out clean. 


The Sunny Side - The Fairmont Zimbali's Never-Ending Bounty

Our first impression of the deservedly well-renowned Fairmont Zimbali Resort came in the form of a long, paved road, cutting through luscious greenery as it ploughed towards the lobby of the 5-star establishment. As we curved along the circumference of a palm-packed roundabout, the hotel’s majestic glass entrance finally came into view and it was then, before attending our custom-planned welcome lunch service, or entering our ocean-view suite, or traipsing across the resort’s private beach, that my husband and I realised the once-in-a-lifetime value of what we were about to experience.

As we would come to realise over the course of our 3-night stay at Durban’s finest resort, the Fairmont Zimbali is so much more than a hotel, and no less than a standalone world, where life is lived to the finest degree, with a most effortless sense of elegance.

The view from our suite

The view from our suite

The Resort

A mere 30-minute drive from central Durban, set on a property almost too vast to imagine, the resort includes a number of restaurants (each of them top-class, but I digress), 5 beautiful outdoor pools, a private beach long enough to walk for hours, a gym, a wonderfully decadent spa and a handful of bars. Basically, a weekend away at Fairmont Zimbali Resort puts you in touch with everything that you could wish to do outside the bounds of the hotel, and then some. And from the shallow end of the main pool, right through to the bicycle rental gazebo, we were greeted with smiles and a special warmth of character, the likes of which is a rarity in today’s busy world.

Zimbali Lodge

Zimbali Lodge

Further into the thick of the property lies the Fairmont Zimbali lodge, a vestige of an older time, and although it’s much smaller than its sister resort, it is certainly not short of character. While venturing through the lodge’s grounds we caught sight of a rare Crown Eagle that has nested just next to the Lodge’s dining area.


The Food

Aside from the extensive breakfast buffet, smoothie bar and obligatory (ahem) Bloody Mary station, the resort boasts a number of restaurants and cafes, each more exquisite than the other. We started our food journey at the cafe/cocktail bar 31 Degrees with a wonderful pair of light meals accompanied by fresh sushi. 31 Degrees would turn out to be our most frequently-visited haunt during the duration of our stay, but it was certainly not our favourite (although the cocktails there were nothing short of phenomenal). The title of best food venue, in my humble opinion, would have to be shared by the North-Indian fine dining restaurant, OSA, and the Mexican eatery, Ayoba!. While OSA’s depth of flavour and authentic North-Indian dishes forced us to push ourselves to uncomfortable levels of fullness, Ayoba! proved to be the light-bite eatery that an early dinner calls for, serving up beautifully-rendered and flavour-packed favourites from the land of Tequila and Tacos. If I were to recommend one dish from each, I would say that OSA’s vegetarian Thali, and the Black Bean Nachos, with chips and guac, from Ayoba! are the most tasty options. Just make sure that you go into the restaurants at Zimbali with an empty stomach, and a lot of time to spare, because you’ll need it.

Breakfast at Coral Tree

Breakfast at Coral Tree

As if the service and quality of food at any one of the restaurants weren’t enough, we had an immaculately prepared and beautifully presented in-room three-course dinner on our final night at Fairmont Zimbali Resort that was on par with any of the other meals we had during our time there. Plus, there’s something super romantic about eating dinner in the comfort of your ocean-view hotel room!


The Extras

During our all-too-brief stay, we were treated by the hotel to - amongst other things - a few really amazing activities. After settling in and getting the lay of the land, so to speak, we were given a couple of bicycles and encouraged to explore the property. A short while later, we found ourselves in the middle of a barely-developed cul-de-sac, having pushed our holiday bodies as hard as we could over hills and through shallow valleys. In this small enclave it only took us a few moments before we realised that the relative silence that had surrounded us for the duration of our ride had been broken by some very inquisitive visitors - Vervet Monkeys. Family groups slowly surrounded us from every angle, chewing on unnamed shrubs and keeping a keen collective eye on us, the new arrivals, while generally going about their rather cute, rather monkey-ish business. While they can be a little bit forward when food is involved, the Vervet Monkeys are absolutely harmless and are a must-see for guests at the resort. A short cycle back to the hotel took us across the path of a young grazing bush buck which, amazingly enough, allowed us to get up close without running off. Such close encounters are simply magical and have to be experienced to be appreciated.

The following day, shortly after breakfast, we were excitedly ushered into what appeared to be a brand new car, with our own private driver, Anthony, and driven to central Durban. There we got the chance to visit Victoria Market place, where we browsed through souvenirs, spices and South African crafts before heading over to Durban’s world famous Botanic Garden, which is home to some of the rarest and most interesting plant species on the planet, including an Orchid house and a specific type of cycad that is last remaining plant of its kind and therefore, an utterly priceless specimen.

Aside from being a kind and pleasant guide during our tour, Anthony was also remarkably knowledgeable on the history and culture of Durban and its surrounds, painting a vivid picture of the city.

Durban Botanical Gardens

Durban Botanical Gardens

To end the day, we took to the beach with a blanket, two baskets full of finger-food, a couple of towels, and a bottle of crisp white wine, to see in the late afternoon on the shores of the Indian Ocean. There’s nothing like a beach picnic next to slow, crashing waves, underneath a pale blue sky.


For more information, please check out:

http://www.fairmont.com/zimbali-resort/

or email zimconciergedl@fairmont.com 

Travelling in Africa's most luxurious train: Rovos Rail

It has taken me quite a while to gather my thoughts on what I have come to realise was one of the greatest experiences of my life to date. I am, of course, referring to our magical 3-day-long journey on the Rovos Rail, the most luxurious train in Africa.

The Pride of Africa

The Pride of Africa

After finishing our complimentary champagne, my husband and I were led from the private departure lounge of Durban’s central train station onto a pedantically-restored train where, along with the other guests, we meandered towards our room whilst marvelling at the interior finishings of the carriages. Once the nostalgia began to ease off enough for us to find our cabin, we settled in and took a moment to admire what would be our room for the next 72 hours. 

Our ample-sized and excessively cosy en-suite bedroom consisted of a surprisingly large double bed, a writing desk with a full outlay of stationary, storage and cupboard space, and a beautifully designed bathroom. All this, lit up by huge windows that make you feel as though you’re outside, among the passing wildlife, was overwhelming enough for the two of us. As with everything on the Rovos Rail though, the sense of comfort alone was not enough - each carriage is assigned its own caretaker, who waits on guests to no end. Every time we returned to our cabin, we slid open our hardwood door to find that the mini fridge had been restocked and re-organised, our bed had been made up in the most lavish fashion, and our small desk had been adorned with a number of quaint little surprises. We knew after our first lunch that this train ride wasn't just a trip, but a carefully-crafted, personalised journey, thanks to the amazing staff onboard.

After getting to grips with our amazing room we moved towards the end of the train and settled in the observation car, which is unsurprisingly the most highly sought-after section of the moving compound. Here, guests meet and mingle in the open air lounge section while washing down icy drinks and admiring the incomparable South African landscape. Trays full of nuts, fruit and crunchy vegetable chips are always full to the brim for those who need a snack between any one of the three meals that are offered onboard.

Views from the observation car

Views from the observation car

G&Ts and snacks at the observation car

G&Ts and snacks at the observation car

The meals were served across two dining cars, furnished with tufted leather chairs and period-piece design elements. Lunch and dinner both comprised of 4 courses - starter, main, cheese and dessert, with wine paired with each of the courses. The food was, as one would expect, impeccable, and the waiting staff were friendly, efficient and all very knowledgeable with regards to the train, its route and the general history of this beautiful country.

Dessert served in the restaurant car

Dessert served in the restaurant car

The journey itself was one of near-mythical status. Starting with the sub-tropical, rolling hills of Durban and ending with the vast urban plains of Pretoria, with a series of stops in between, each one more interesting and exhilarating than the last. The first stop was the fabled Ardmore ceramics gallery, a privately-owned and locally-run creative hub full of beautiful hand-made and carefully painted one-off pieces. After an extensive tour of the workshops, we settled in for tea under ancient overhanging trees before ambling back towards the bus at the end of the afternoon.

Lady painting her vase at Ardmore ceramics

Lady painting her vase at Ardmore ceramics

Tea and cake overlooking the river

Tea and cake overlooking the river

The next morning we ushered in the sunrise on the back of a safari Land Rover as we made our way through the crisp morning air in the Nambiti private game reserve. Our apprehension over the possibility of not seeing any wildlife was soon quelled by the arrival of a friendly and inquisitive elephant who was grazing through bushes at the roadside, helping himself to nature’s breakfast buffet. The remainder of our drive was highlighted by sightings of hippos, zebras, giraffes, wildebeest, warthogs, and various buck. Safe to say, by the time we got back to the train, we felt as though we knew South Africa - and its beautiful animal residents - so much better.

Our ride

Our ride

A dazzle of zebras and a giraffe. 

A dazzle of zebras and a giraffe. 

That evening, between lunch and dinner, guests on the train were invited to Spionkop Lodge, where they were given a choice between a second game drive (and the chance to see any animals they may not have seen earlier in the day), or a historical journey in words, told by one of the world’s most well-respected voices on the subject, Raymond Heron. My husband and I opted for the latter and thoroughly enjoyed the retelling of that particular chapter of South Africa’s storied past from a perfect vantage point above the hills and valleys of the region.

The views from Spionkop Mountain

The views from Spionkop Mountain

We finished up at Spoinkop lodge itself, overlooking the thunder-stricken surrounds while sipping on a crisp white wine. The perfect end to an amazing journey.

The next day, we all rolled into Rovos Rail’s very own colonial-style train station in Pretoria, powered by a steam locomotive the likes of which is rarely seen anywhere in the world these days, let alone in South Africa. A quick and slightly emotional departure left us longing for just one more evening on Rohan Vos’s dream train. Until next time, we’ll be waiting with bated breath.


If you want extra information on the trip, please check the Rovos Rail website, or contact them via reservations@rovos.co.zaThey have so many amazing trips with various lengths, something for everybody. And if I haven't made it clear yet - it is one of the most amazing journeys you will ever get to experience!

DELICIOUSLY VEGAN - recipes by Anett

I've been quietly working on something for the past few months, getting up early in the morning to start recipe testing, and going to sleep very very late, writing down my last thoughts and ideas for the next day. All for this app - Deliciously Vegan, a collection of my favourite healthy, delicious recipes by yours truly. 

To be honest, I never imagined creating a recipe app, but once I'd thought about it more then it seemed like the best option of all. An endless canvas for me, and endless amount of recipes for you. 

At this point in time there are 150+ (!!) recipes, divided into categories and more sub-categories for ease of use. And, to tell you in secret, I've got loads more planned. Just need to find the time to take pictures and test the recipes. There may even be a video category in the works, but Shhhhh...

A couple of my favourites from the app:


If you are interested in the app then you can find the download link here - https://appsto.re/us/fikFhb.i. There is currently just the iOS version, but we are working on getting the Android one out there too.

I appreciate each and every one of you who take the time to download the app and test the recipes, lots of love to you all! 

Don't forget to tag your recreations with #deliciouslyveganapp, I'll be reposting them on my page too!

x A