Vanilla Blueberry Baked Cheesecake

This cake, touted by my husband as the ‘‘best cake I’ve ever made’’ and requested as her birthday cake by my grandma, is honestly one of the yummiest things that has ever come out of my oven. With a soft, crispy crust, and a light cheesecake-y filling, it is the perfect sweet-but-not-too-sweet treat. And surprisingly simple to make!

It has quickly become a staple at our house, with topping variations from macerated strawberries to sautéed apples loaded with cinnamon. So if you’re looking for an easy but super delicious cake, this is most definitely it!

blueberry cheesecake.jpg


Vanilla Blueberry Baked Cheesecake

Serves 6-8

For the base:

2 cups plain flour

1/3 cup brown sugar

1/4 tsp sea salt

3/4 cup vegan butter or margarine, softened

1-2 tbsp cold water, as needed

For the filling:

8.8 oz vegan cream cheese, soy or oat-based

12 oz extra-firm silken tofu

1/2 cup brown or coconut sugar

1 tbsp lemon juice

2 tbsp cornstrach or arrowroot flour

2 tsp vanilla extract or paste

1/3 cup plant milk

Blueberry topping:

1 cup frozen wild blueberries

2 tbsp water

2 tbsp maple syrup

1 tbsp cornstarch or arrowroot starch


  1. To make the base, combine the flour, sugar, salt and butter in a food processor. Process a few times until well mixed. With the motor running, slowly add the cold water until the dough comes together and sticks when pressed between two fingers.

  2. Place the dough between two pieces of parchment paper and press down to create a flat dough circle. Place in the fridge for at least 30 minutes. 

  3. Preheat oven to 180C/350F. Line the based of an 8-or 9-inch/22 cm springform tin with baking paper. 

  4. Remove dough from the fridge. Roll it out so it it a bit bigger than your baking tin. Transfer dough to prepared baking tin and press firmly up the sides and bottom. Place in the fridge until needed.

  5. Make the filling by combining the cream cheese, silken tofu, sugar, lemon juice, cornstrach, vanilla and plant milk in a blender. Blend until very smooth, 1-2 minutes. 

  6. Pour into the prepared crust and tap lightly on the kitchen counter to release any air bubbles. Place in the oven and cook for 30-40 minutes. Remove from oven and cool completely, best overnight. The cheesecake filling will puff up quite a bit in the oven but it will deflate again as it cools. 

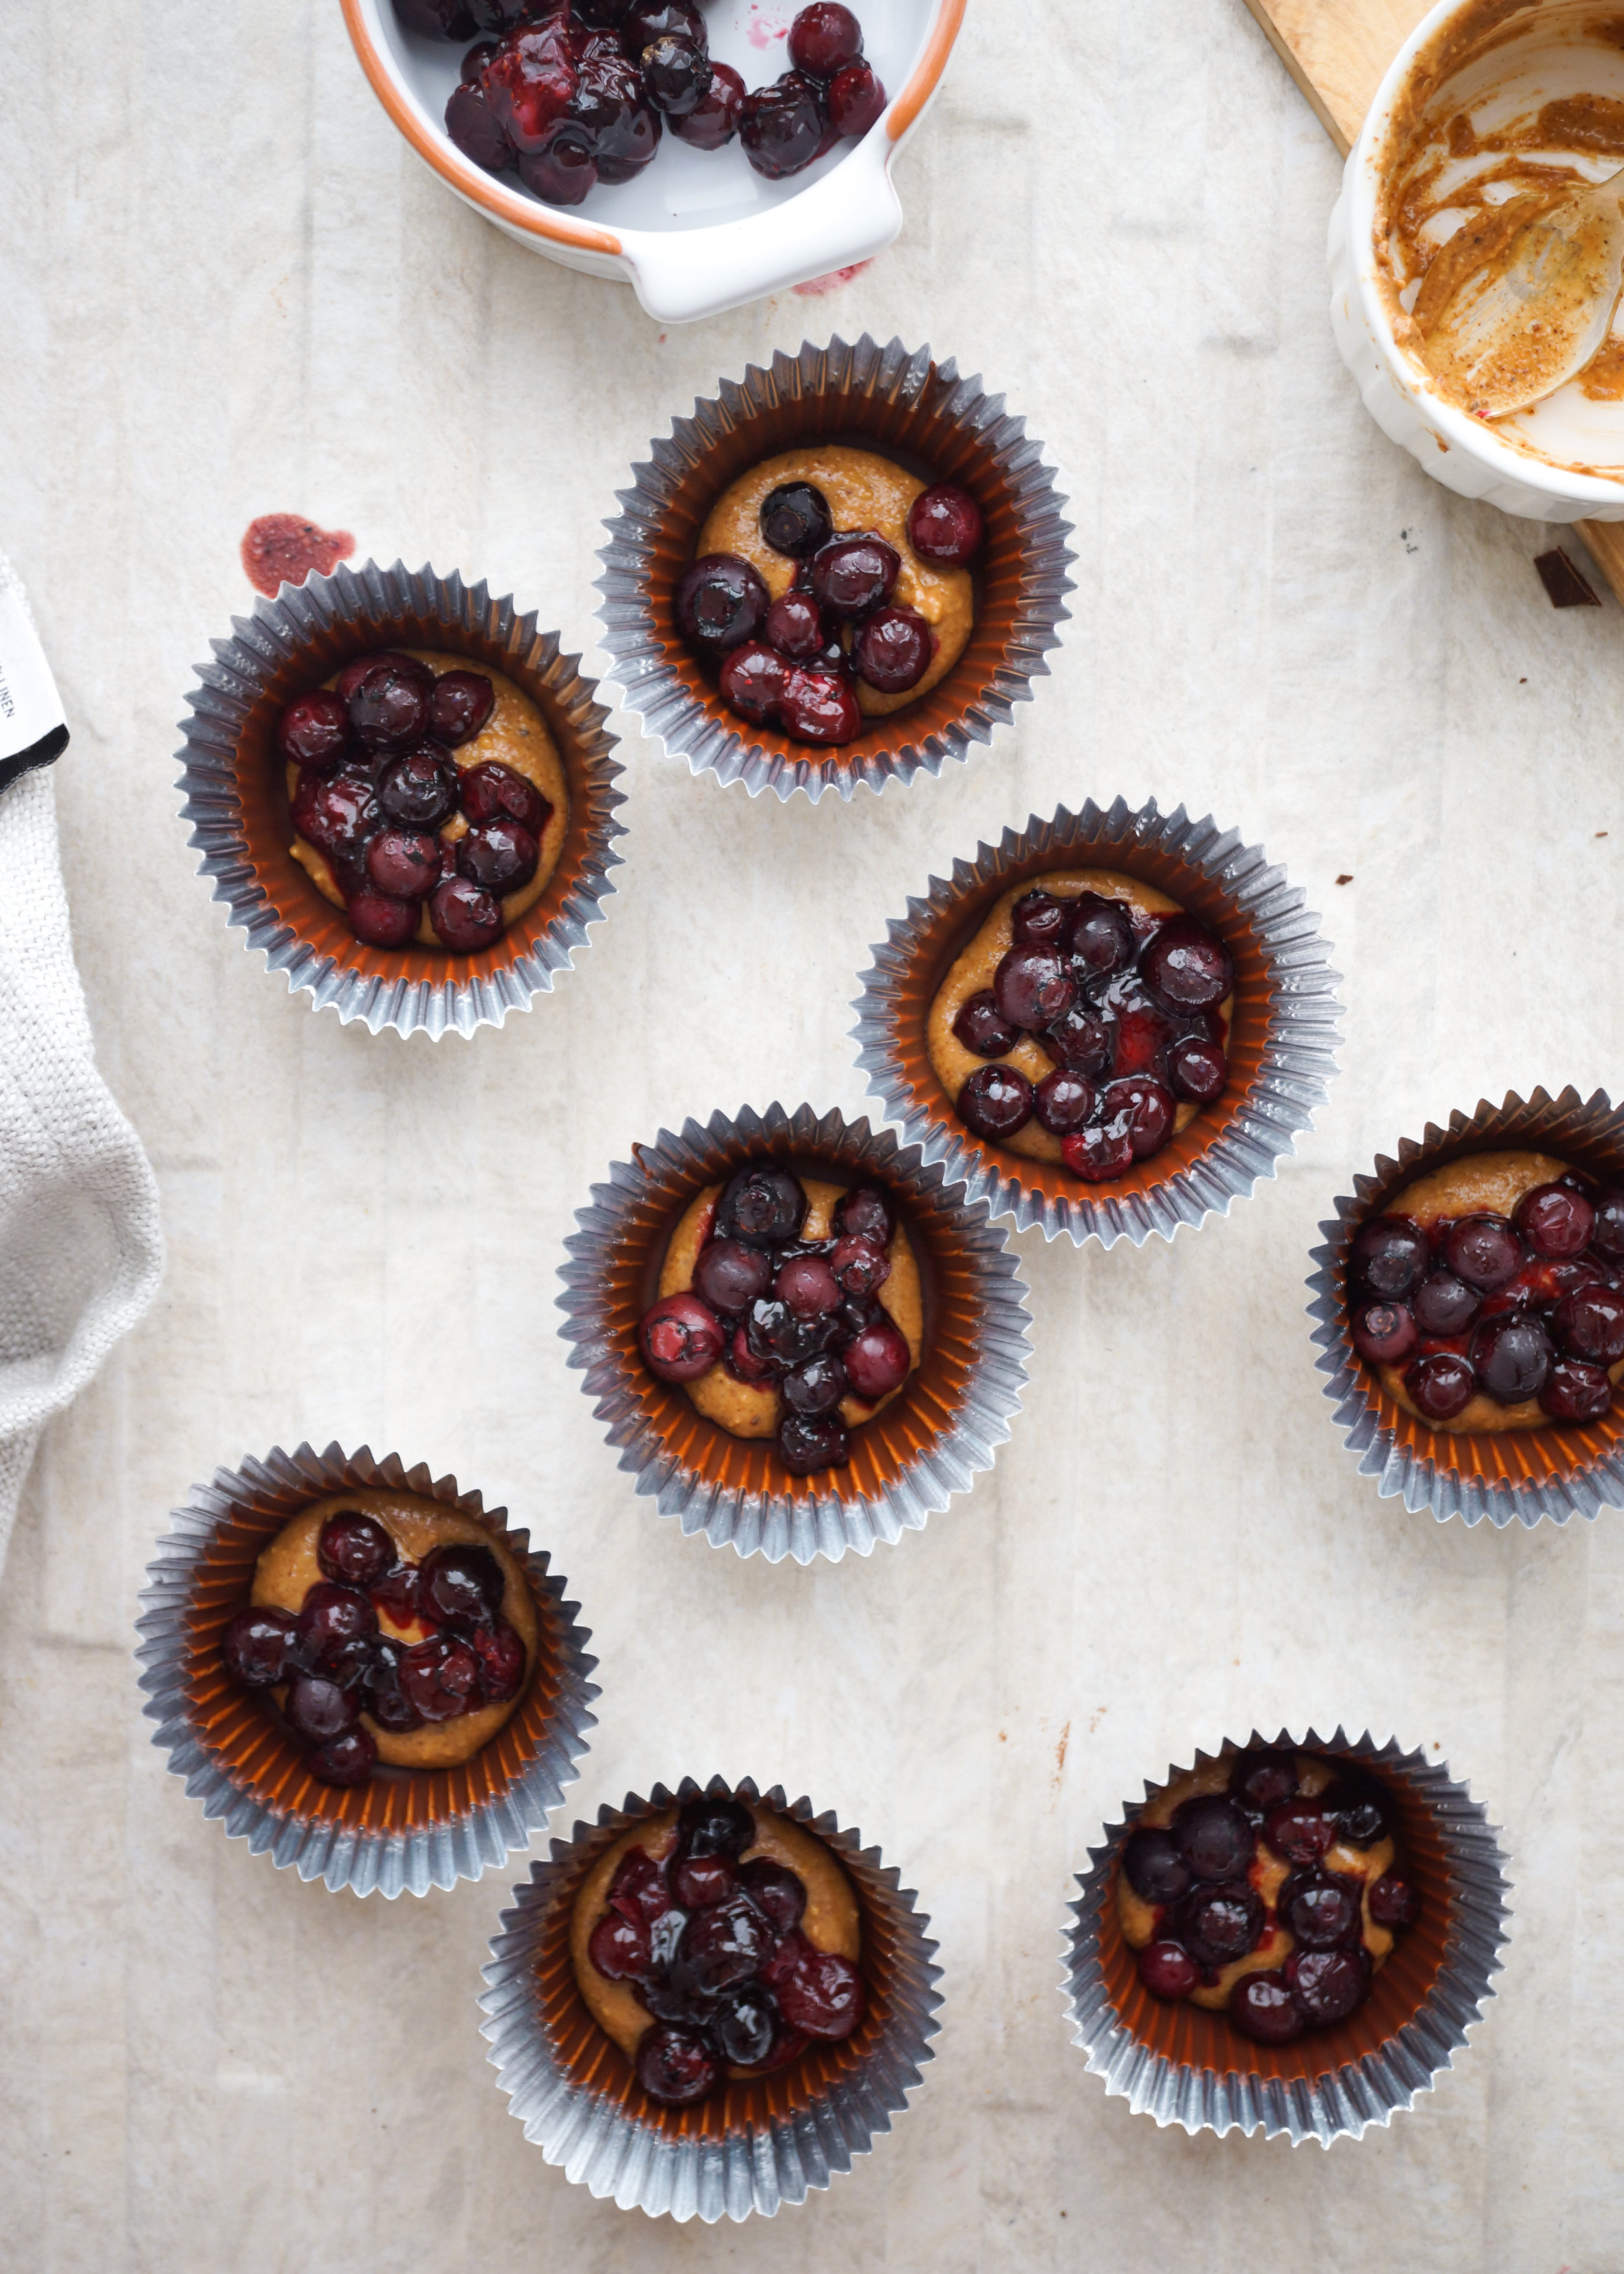
  7. When the cake is cool, make the blueberry topping by combining the blueberries, water, maple syrup and cornstarch in a small saucepan. Place on medium-high heat and bring to a simmer, stirring constantly, until the mixture thickens. Remove from heat and cool. 

  8. Spread the blueberry mixture on top of cake. Slice and serve. Enjoy!

blueberry cheesecake-2.jpg

Cinnamon Buns with Tahini Glaze

I don’t think there’s a single person out there who doesn’t love cinnamon buns. And the smell that fills the kitchen as they bake is almost reason enough to make these by itself! I have created many different types of cinnamon buns throughout the years but these are by far my favourite. There’s just something about the combination of fresh bread, cinnamon and tahini that wins my heart.

These buns are even more special since they include an edible souvenir I brought back from my recent food trip to Israel with Vibe Israel . You can read from my previous blog posts about all the amazing vegan restaurants we went to and the street food we ate, but on top of this we also visited the Al Arz tahini factory, which has some of the best tahini in the world (in my humble opinion :)).

It was a dream come true on so many levels - getting to taste hot tahini straight from the machine is something I’ll never forget. We got to see how tahini is made and bottled, taste different tahinis as well as pistachio and coffee halwa. And even though their tahini is SO GOOD that you can just eat it with a spoon, drizzle on veggies or mix with date syrup for a caramely sweet sauce, I had to create a recipe with it too as soon as I got home.

This recipe combines my love for cinnamon buns and tahini in a lip-smacking baked treat. I hope you love them as much as I do!

I am forever grateful for Vibe Israel for this eye-opening trip. You can follow their Instagram to see what else they’ve got going on - they organize exciting tours showing the best of Israel throughout the year!

  1. To make the dough, place the lukewarm milk, sugar, salt and coconut oil in a large bowl and mix until the sugar has dissolved. Add the yeast, then start adding the flour bit by bit until the mixture comes together. You may not need all the flour. 

  2. Dust a working surface and knead the dough for 6-8 minutes until uniform and springy. You can also do this with a mixer and dough attachment. Place the dough in a lightly oiled bowl and let rise for 1-2 hours in a warm place, until doubled in size. 

  3. While the dough is rising, make the filling by mixing together the vegan butter, brown sugar, ground cinnamon and cardamom. Set aside.

  4. Preheat oven to 375F/180C. Roll out the dough into a rectangle on a floured surface, the spread the cinnamon mixture on top. Roll the dough up, creating a cylinder, then slice crosswise into rolls. 

  5. Place parchment paper in a small baking tin and arrange the buns. Cook for 30-35 minutes, until lightly browned on top. Let cool. 

  6. Make the icing by mixing together tahini and icing sugar. Drizzle on top of the buns. 

  7. Best served when still warm. Enjoy!

Dough:

1 cup lukewarm unsweetened plant milk

1/3 cup brown sugar

1 tsp salt

1/4 cup melted refined coconut oil or vegan butter

1 tbsp fast action (instant) yeast

2 1/2 cups plain flour

Filling:

3 tablespoons vegan butter, melted

3/4 cup light brown sugar

1 ½ tablespoons ground cinnamon

1 tsp ground cardamom

Glaze:

2 tbsp runny tahini

1/2 cup - 1 cup powdered sugar

Salted Cookie Dough Fudge

I love all salted desserts - the combination of sweet and salty is just so divine! Not to mention combined with dark chocolate and fudgy texture. SO good!

This recipe is gluten-free and vegan, whole ingredients (except for the chocolate), only 7 ingredients, ready in 1 bowl and less than 30 minutes (and just 10 minutes hands-on time!).

It serves as the perfect afternoon pick-me-up with a cup of coffee/tea/matcha and keeps in the fridge for up to a week. As if it will ever last that long!

If you are looking for more recipes like this, be sure to check out my Deliciously Vegan iOS App and my E-Book!

Salted Cookie Dough Fudge

Time: 30 minutes

Yields 14-18

1 block (2,82 oz/80 gr) dark sea salt/regular chocolate

1 cup (250 ml) unsweetened, runny almond butter

1/3 cup (80 ml)maple syrup

1/4 cup (60 ml)melted refined coconut oil

1 tsp vanilla paste or powder

1 cup (250 ml) gluten-free oat flour

1 tsp flaky sea salt (optional)


  1. Finely chop the chocolate. Set aside.

  2. In a medium-sized bowl, whisk together the almond butter, maple syrup, coconut oil and vanilla until smooth.

  3. Add the oat flour and mix with a spatula until even. Fold in the chopped chocolate.

  4. Line a 6x6 inch baking pan or equivalent with parchment paper. Press dough evenly into prepared pan and sprinkle on the flaky sea salt.

  5. Place in the freezer for 15-20 minutes or until firm.

  6. Remove from pan and slice into squares.

  7. Serve immediately or refrigerate until needed.

cookie dough fudge

Vegan Lemon Poppyseed Muffins

Muffins have always been my favourite go-to, quick baked treat. These ones come together so quickly and they have a wonderful tangy flavour. Combine that with poppy seeds and you've got yourself a real winner! 

When I was growing up the poppy seed rolls were one of my favourite baked treats. I haven't eaten one in years now but baking anything with poppy seeds reminds me of a simpler time when young Anett could easily eat one or two of those pastries a day straight from the bakery. Those where the days, eh?

Lemon poppyseed muffins

If you want more delicious vegan baked treats and other recipes then check out the Deliciously Vegan App - there's over 200 recipes there already and counting! Over the past months I've put most of my emphasis on creating more recipes for the app, and to be completely honest, this blog as been left a bit on wayside. But I am working on new recipes for you my blog peeps now, so hold tight!

Ingredients

makes 6 big or 9 small muffins

  • 2 cups plain flour

  • 2 tsp baking powder

  • ¼ tsp baking soda

  • 3 tbsp poppy seeds

  • 1/2 tsp powdered vanilla (sub vanilla extract)

  • 1/2 cup + 2 tbsp organic brown sugar or coconut sugar

  • 1/2 tsp salt

  • 1/3 cup melted vegan butter or avocado oil

  • zest & juice of 1 lemon

  • 1 cup soy milk

  • 1 tsp apple cider vinegar

for the glaze:

  • ¾ cups powdered sugar

  • 1-2 tbsp fresh lemon juice

Method

Preheat oven to 180C. Line a cupcake tray with muffin liners.

In a medium sized bowl, combine the flour, baking powder, soda, poppy seeds, vanilla, sugar and salt. Mix well.

In another bowl, combine the melted butter, lemon juice, soy milk and apple cider vinegar. 

Add the wet ingredients to the dry ones by folding the batter gently until smooth and incorporated. Spoon into cupcake liners and bake for 15-20 minutes, until a toothpick inserted comes out clean. Let cool completely before icing.

To make the icing, combine the powdered sugar and lemon juice until you reach the desired consistency. Pour over muffins. Enjoy!

vegan muffins

Vegan blueberry latte

A beautiful, fruity latte, perfect for winter and summer alike. 

Summertime in Nordic countries means two things - slightly warmer weather than the rest of the year and an abundance of things to forage in the forests. Mushrooms and berries, most importantly. 

This recipe highlights my favourites - wild blueberries or bilberries. They've got so much flavour and punch packed into a small round package, it's impossible not to love them! In summer we usually freeze as much as we can for the winter ahead, perfect for making these lattes later in the year!

If you can't find bilberries then regular blueberries will work just as well! Living in South Africa means that there are no bilberries here, which is why I've used regular blueberries for these pictures too. It tastes really amazing!

10 minutes

for 1-2 people

Ingredients

3 heaped tbsp blueberries, fresh or frozen

1 1/2 cup plant milk (oat/almond milk is best) + more for foaming

1/2 cup water (optional)

1-2 berry tea bags (rooibos works well too)

1 tsp powdered vanilla (sub with vanilla extract)

1/2 tsp cinnamon

1/2 tsp cardamom

 Place all ingredients in a small saucepan and bring to a simmer. Turn the heat off and let infuse for 5 minutes, then remove the tea bag and pour into cups. Foam the milk by placing a few tbsp in a French press and moving the handle up and down. Pour on top of the latte and sprinkle cinnamon on top. 

Oyster mushroom maki rolls

Every Saturday there is an organic market in Cape Town called the Oranjezicht City Farm Market. We go there as often as we can, stocking up on vegetables and fruits of the season as well as some of the most beautiful mushrooms our eyes have ever seen - including the beautiful pink oyster mushrooms used in these rolls.

They have a wonderfully delicate flavour, ready to be enhanced by whatever you with to cook it with. My favourite additions are simple - a bit of tamari, a bit of mirin, and sesame oil. Wonderful with noodles and rice alike!

We often sautee the oysters, julienne a variety of vegetables, and put the combination into wonderfully textured vegan maki rolls (as you might have heard, my husband loves anything and everything Japanese, including copious amounts of sushi rice each week).

As with any of my recipes - use the filling as more of a guideline and substitute the vegetables and mushrooms with whatever you have in your pantry. 

Ingredients

For the rice:

3 cups/555 gr of sushi rice

700 ml water

1 ribbon of kombu (optional)


For the sushi seasoning:

90 ml sushi rice vinegar (Mizkan works very well)

2 tbsp of sugar

2 tsp of salt


For the mushrooms:

1 tbsp toasted sesame oil

1 garlic clove, finely chopped

1 tbsp mirin

1 1/2 tbsp tamari

1/2 tbsp maple syrup

200 gr oyster mushrooms, roughly chopped


for the filling:

1 carrot, julienned

50 gr of purple cabbage, julienned

3-4 pieces of tenderstem broccolini (optional)

1 large avocado, thinly sliced


Extras: 

4 nori sheets, more if needed

black and white sesame seeds, for garnish

tamari or soy sauce, for dipping


Method

Wash the rice in a sieve under cold water until the water runs clear. Place the rice in a pot with the water and soak it for 30 minutes. 

Put the pot, lid off, on a high heat until it starts to boil, stirring gently every 2-3 minutes with a wooden spoon. Once it starts boiling, cover the pot with a lid and turn the heat down to the lowest. Cook covered for 8-10 minutes, until all the water has been absorbed and rice grains fat shiny. Turn the heat off and place a towel over the top of the pot so that no steam escapes. Leave to steam for 15 minutes.

 While the rice is steaming, make the sushi seasoning. Heat all the ingredients in a small saucepan over low heat, stirring until the sugar and salt have dissolved. Be careful not to boil. Let cool once once. 

When the rice is ready, gently spoon it into a wide bowl (wood or plastic, not metal) with a wooden spoon/spatula and pour the sushi seasoning over it evenly. Fold the rice gently to incorporate the seasoning and cool the rice. 

For the mushrooms, combine the sesame oil, garlic, mirin, tamari and maple syrup in a bowl and add the chopped mushrooms. Let marinate for 5 minutes, then cook on a medium heat until soft and caramelised, 5-7 minutes. Leave aside.

To make the rolls, place a nori sheet on a bamboo rolling mat, shiny side on top. Cover the nori with rice, using wet hands, leaving 2 cm empty on the top.  I keep a bowl of cold water near as I roll to make the process easier. 

Arrange the vegetables and mushrooms in a line near the bottom of the sheet and roll up tightly, wetting the empty nori at the top so that it sticks together. Repeat with rest of nori sheets and vegetables, then cut the rolls into pieces and sprinkle sesame seeds over. Serve with tamari for dipping. 


Vegan banana chocolate chunk muffins

Fluffy muffins, sweet banana & slightly bitter chocolate chips. Ready in next to no time and perfect with a cup of tea or coffee.

This muffin recipe is another one made with the magic of aquafaba aka chickpea water. It is best to use a can of good quality organic chickpeas (make hummus from those!), drain into a jar and keep in the fridge. You can also freeze it in ice cube trays to use whenever you need it!

I find that the combination of banana and aquafaba creates the most perfect moist muffins, which is why I come back to these again and again. I've also added walnuts and blueberries to the mix and it tastes amazing! So feel free to play around. 

Vegan banana muffins

Vegan banana muffins

Ingredients

2 small ripe bananas

3 tbsp aquafaba

3 tbsp almond milk 

3 tbsp maple syrup

2 tbsp almond butter

1/2 tsp salt 

2 tbsp coconut oil, melted

1 cup plain flour

1,5 tsp baking powder

1/2 tsp pure vanilla extract or vanilla powder

40 gr dark chocolate, roughly chopped or dark chocolate chips

Method

Preheat oven to 180C. 

Combine the bananas, aquafaba, almond milk, almond butter, salt and coconut oil in the jug of a blender and blend until smooth. 

In a large bowl, combine the flour, baking powder, vanilla and and dark chocolate chunks/chips. Fold in the wet ingredients until you get a smooth consistency. Line a muffin tray with cupcake liners and scoop the batter into the pan. Bake for 20-25 minutes, until browned on top and a toothpick inserted comes out clean. 


DELICIOUSLY VEGAN - recipes by Anett

I've been quietly working on something for the past few months, getting up early in the morning to start recipe testing, and going to sleep very very late, writing down my last thoughts and ideas for the next day. All for this app - Deliciously Vegan, a collection of my favourite healthy, delicious recipes by yours truly. 

To be honest, I never imagined creating a recipe app, but once I'd thought about it more then it seemed like the best option of all. An endless canvas for me, and endless amount of recipes for you. 

At this point in time there are 150+ (!!) recipes, divided into categories and more sub-categories for ease of use. And, to tell you in secret, I've got loads more planned. Just need to find the time to take pictures and test the recipes. There may even be a video category in the works, but Shhhhh...

A couple of my favourites from the app:


If you are interested in the app then you can find the download link here - https://appsto.re/us/fikFhb.i. There is currently just the iOS version, but we are working on getting the Android one out there too.

I appreciate each and every one of you who take the time to download the app and test the recipes, lots of love to you all! 

Don't forget to tag your recreations with #deliciouslyveganapp, I'll be reposting them on my page too!

x A

Almond butter caramel puffed rice bars

Who would have thought that combining almond butter, water, maple syrup and dates would result in such an amazingly delicious caramel sauce that I just want to keep it in my fridge forever and ever and eat with pretty much everything (pro tip: apple slices + this is heaven). And, that adding puffed rice to it and topping it with melted chocolate would turn it into such a delicious crispy treat that I can't stop myself from finishing the whole batch in a couple of days. All with the magic of almond butter

Safe to say I'm pretty much obsessed with almond butter right now, and for a good reason. Not only is it delicious, creamy and flavourful but also packs such a nutritional punch and tastes amazing in both sweet and savoury dishes (almond butter satay sauce, yes please!).

Getting back to these bars - they are crispy, sweet and utterly indulgent. They also take you right back to your childhood, munching one one of those crispy treats that we used to love. Writing reminds me that I have some puffed rice still in the cupboards, so see ya laterz, I'mma go make another batch!

Ingredients

3/4 cups MyProtein almond butter

1/3 cups coconut oil

1/4 cups maple syrup

1/4 cups fresh dates (or dried and soaked until soft)

pinch of flaky sea salt

3 1/4 cups puffed brown rice

50 gr raw almonds, roughly chopped

100g dark chocolate, roughly chopped

Method

Combine the almond butter, coconut oil, maple syrup, dates and salt in a blender or food processor and blend until creamy. Add a bit more water if needed. 

Place the puffed rice and almonds in a big bowl and mix. Add the almond butter caramel and stir so that everything is coated. Place in a 20cm x 20 cm tray lined with baking paper and push down evenly.

Melt the chocolate in a tight-fitting bowl over boiling water. Pour on top of the puffed rice mixture and place in the freezer for 30 minutes or until hardened. Cut into bars and store in the fridge. Enjoy!

Easy potato dahl

Dahl is the Indian word for lentils, and that’s what this dish is all about. Red split lentils, simmered and spiced to perfection.

The best way to make use of this recipe is by using whatever curry powder you have. When I first made this I had exactly two tablespoons of Korma curry powder and it worked like a treat. Next time it was just a medium curry paste and it was still absolutely amazing.

I like to play around with the additions to this – sometimes add potato, other times sweet potato or butternut. It all depends on what you have in the pantry. But always, always top with some fresh coriander!


Ingredients

2 tbsp cooking oil

1/2 yellow onion, roughly chopped

3 large garlic cloves, minced

1 inch piece of ginger, minced

1 small red chilli, finely chopped

1 tsp ground cumin

1 tsp ground coriander

1 tsp ground turmeric

1/2 tsp ground cinnamon

3 tbsp medium curry powder/curry paste of your liking

1 tsp smoked paprika

1/2 tbsp dried curry leaves

juice from 1/2 medium-sized lime, more if needed

2 potatoes, roughly chopped

1 can chopped tomatoes (400g)

200 ml coconut cream

1 cup water

1 cup red lentils

salt, to taste

pepper, to taste

fresh coriander (cilantro) for garnish

2 cups cooked  basmati rice, to serve

freshly baked flatbreads, to serve


Method

Heat oil in a medium-sized saucepan. Add the onion, garlic, chilli, ginger and all the spices and curry leaves. Fry until fragrant, 2-3 minutes. Add the potatoes and fry for 3 more minutes, until slightly golden.

Add the coconut milk, chopped tomatoes, water and lentils and bring to a simmer. Let simmer for 30 minutes, until the potatoes and lentils are soft.

Season with salt, pepper and lime juice. Serve over cooked rice with flatbreads and garnish with fresh coriander. Enjoy!

Overnight fig & blueberry bircher muesli

Summertime in Cape Town can be described in one word - hot. So anything warm is a serious no-go for breakfast. And while smoothies are always going to be a winner for me, this simple bircher muesli is creeping up there too. 

It is so simple to whip up and I love having it in the fridge. Add what ever fruits & berries you currently have and breakfast is served! Couldn't be more easy. 

Now, a lot of people have asked me what camera I shoot with over the years. I recently upgraded to a Canon EOS 5D Mark iv, and lemme tell you. This camera is phenomenal. It is on the pricier side, but it is well worth it. The quality of images and sharpness is exquisite. If this is out of your price range then I also looked into Canon EOS 6D and there's supposed to be a new version of it out in spring 2017. It will be a lot cheaper than the 5D but still a full-frame, which is what you want because otherwise you must take into consideration a crop-factor when purchasing a lens. If this is all a bit confusing for you then read up on full-frame cameras vs cropped frame. It's actually pretty simple but worth knowing!

I used to shoot with a Sony Nex 7, and whist I do recommend it as a good camera for beginners, if you are serious about taking your (food) photography to the next level, invest in a full-frame DSLR. 

A now a bit about lenses - I must tell you that I still don't know much about them, except for the basic ones that are recommended for food photography which are 50mm, 35mm and Macro lenses. I am currently shooting with the Sigma 50mm f1/4 Art lens and the photos it produces take my breath away every time. If that also is out of your budget then the Canon 50mm is a really good buy too! I might invest in a 35mm soon, to achieve wider angles but for now I'm really happy. 

(Btw - I receive no money for this talk. Just me tryna help you guys out. Love x )

Back to the food - try this bircher muesli. I love it. You wont regret it. 

Ingredients

1 cup rolled oats

2 tbsp chia seeds

2 tbsp coconut flakes

2 tbsp maple syrup

1 ripe banana, mashed

2 tbsp blueberries + more to serve

400 ml almond milk 

1 fig, thinly sliced, to serve

2 tbsp raspberries, to serve


Method

Combine the oats, chia seeds, coconut flakes, maple syrup, banana, blueberries and almond milk in a bowl and mix to combine. Place in the fridge over night. 

The next day, serve the muesli with figs, blueberries and raspberries. Enjoy!


Blueboost collab: Roasted blueberry & almond butter dark chocolate cups

These bite-sized treats are pretty much the epitome of deliciousness – sweet, creamy and chocolatey. The roasted blueberries add a wonderful fruity aspect, as well as a good nutritional punch. Combine it with the protein from almonds and the antioxidants from dark chocolate and we have a sweet treat that is pretty much a nutritional powerhouse whilst still remaining utterly decadent. 

Best of all – these are ready is less than an hour and can last in the fridge/freezer for a couple of weeks. That is if you don’t finish them before.

To make these delicious treats I teamed up with Blueboost, who not only supply South Africa with the BEST blueberries but also publish a truly inspiring blog of all things good. You can find a couple more my recipes on there too!

Now, to get back to the chocolate cups, you can make these in any size cupcake liners – small ones work really well too! Also, then you might not eat an entire chocolate cup at once and they might last you for longer. 

I was smitten by these from the first bite – I’m sure you will be too!

Total time 1 hour
Makes 8 big or 12-14 small ones

Ingredients
1,5 cups blueberries
0,5 tbsp honey
1 tbsp lemon juice
2/3 cup natural (unsweetened/salted) almond butter
170g dark chocolate, roughly chopped

Extras:
Non-stick cupcake liners, small or large


Method

Preheat the oven to 180C.

In a medium-sized bowl, combine the blueberries, honey and lemon juice. Mix well. Place in a single layer on an oven-tray and roast for 10-15 minutes, until the blueberries have released some of their juices. Let cool at room temperature.

While the blueberries are roasting, melt the chocolate in a tight-fitting bowl over a pot of boiling water. When the chocolate is melted, place a tablespoon of it into a cupcake liner and swirl it around to coat the sides about 2-3 cm high. Repeat with the rest of the liners and place in the freezer to solidify for 15-30 minutes. 

When the chocolate has solidified, place a teaspoon of almond butter in each and top with a tablespoon of roasted blueberries and their juices. Top with a tablespoon of melted chocolate (if it has solidified then place in back over boiling water, slowly heat it up again). Place the cups in the freezer for 30 minutes or until solidified. Keep in the fridge or freezer. Enjoy!

Crunchy baked potato chips & a an avocado-lime dip

This is my quick potato wedge recipe that is perfect for lunch, dinner as just as a snack. It takes so little time and prep and the results are divine every single time!

Ingredients

500g roasting potatoes, quartered lengthwise

2 tablespoons avocado oil

2 garlic cloves, finely grated (I use a microplane)

1 tsp smoked paprika

1 tsp dried rosemary

1 tsp dried thyme

1½ teaspoons sea salt flakes

for the dip:

2 large ripe avocados

juice from 1/2 lime

1/2 cup unsweetened plantbased milk, more if needed

salt, to taste

white pepper, to taste


Method

Preheat oven to 200C. Place potato wedges in a bowl and toss with oil, spices, herbs, salt and pepper. Place on a baking sheet and spread them apart in a single layer. Place in the oven and roast for 20-25 minutes until crispy, turning half way.

To make the sauce, place everything in a blender and whizz to until smooth. Taste and adjust seasoning. 

CREAMY VANILLA OATS with almond butter and blueberries

Oats are a daily visitor to our house, no matter the season. To be honest, basically my whole food regimen outside of photography/recipe creation times consists of oats, smoothies and avo toasts. So basic, I know. 

This oat porridge however, is far from basic. The creamy almond butter, fresh bluebs and swirls of dark chocolate make it so divine that you wish you had more in your bowl even though you are completely full. 

Ingredients

100g quick-cooking oats

500 ml almond milk

2 tbsp chia seeds

2-3 tbsp sweetener (I use maple), more if needed

1 tsp vanilla essence 

pinch of salt

2 tbsp almond butter

handful of fresh blueberries

1 tbsp almond, roughly chopped

2 slabs of dark chocolate, finely chopped


Method

Place the oats and almond milk in a pot over medium heat and add the salt, vanilla and sweetener. Cover and cook for 4-5 minutes, then stir in the chia seeds and remove from heat. Keep the lid on for another 2-3 minutes, then transfer to a bowl and top with almond butter, blueberries, chopped almonds and dark chocolate. 


Mushroom tacos with an epic pineapple & corn salsa

If you like tacos then you are gonna looooove these. The salsa is just so good that I ate the leftovers first with potatoes, then in a salad and thirdly just on toast. Yup. I'd make an extra batch if I were you. 

Mushroom tacos
Pineapple and corn salsa

Ingredients

125g brown mushrooms, thinly sliced

3 tbsp cooking oil

1 garlic clove, minced

1/4 tsp cumin

1/4 tsp ground coriander

1/2 tsp salt

1/2 tsp chili flakes

juice from 1/2 lime

freshly ground black pepper, to taste

4-6 small organic corn tortillas


for the salsa:

1/4 pineapple, finely chopped

100g organic tinned sweet corn (fresh and grilled is even better!)

1/4 onion, finely chopped

handful of coriander, finely chopped

juice from 1/2 lime

salt, to taste

pepper, to taste


extras: 

2 avocados, thinly sliced

1/4 red cabbage, thinly sliced

3-4 tbsp vegan mayo mixed with 1 tsp lime juice


Method

Heat oil in a pan. Add the mushrooms, garlic, cumin, coriander, salt and chili flakes. Cook until soft, then take off heat and add the lime juice and black pepper. Taste and adjust seasoning.

To make the salsa, combine all the chopped ingredients in a bowl with the lime juice, salt and pepper. Taste and adjust seasoning.

To assemble, place all the ingredients on the tortilla and finish up with the mayo and a bit of lime juice and coriander on top. Serve immediately. Enjoy!

 
Vegan mushroom tacos

Sweet potato, kale & cashew korma

When I started testing out different korma recipes then I was baffled by the amount of time an effort that goes in. Being the impatient young woman that I am, this was clearly not the way for me, so I opted to create a recipe with sooooo many less ingredient and soooo much less time but still very very tasty. 

For 3-4 people

Time: 1 hour

Ingredients

1 tbsp coconut oil

1 medium sized yellow onion, finely chopped

4 garlic cloves, minced

1 tbsp grated ginger

200 ml chopped tomatoes

2 tbsp curry powder

1 tsp Garam masala

1 can (400 ml) full fat coconut milk

1 medium sized sweet potato, diced

80g raw cashew nuts

80g kale, roughly chopped

salt, to taste

freshly ground Tellicherry pepper, to taste

To serve:

200g jasmine rice, cooked to package instructions

handful of fresh coriander

1-2 pieces of flatbread/naan bread


Method

Heat the coconut oil in a heavy-bottomed pan. Add the onion, garlic and ginger and cook for 4-5 minutes. Add the chopped tomatoes, curry powder, Garam masala, coconut milk, sweet potato and cashew nuts and let simmer for 20 minutes. When the sweet potato is almost soft, add the kale and simmer for 10-15 more minutes. Season with salt and Tellicherry pepper and serve over jasmine rice and naan bread, topped with cilantro. Enjoy!

RAINBOW VEGGIE BOWLS with a peanut sauce

I love throwing together bowls full of colourful delicious vegetables and calling it 'dinner'. This time around we couldn't decide on a starch - it turns out that the beau does not like brown rice. At all.  I, on the other hand, could eat it three times a day. So we agreed to disagree and I made two bowls, one with soba noodles and one with brown rice. Both equally as good and so so so delicious with the peanut sauce. 

For the vegetables we used basically everything that we had in the fridge. Roasted sweet potato & broccoli, Portobellini mushrooms, finely sliced candy beetroot, purple red cabbage. All these colours make me excited for tomorrow's dinner!

makes 2 large bowls

total time: 45 min

Ingredients

300g soba noodles, boiled for 4 minutes or 1 cup brown rice, cooked
1 large sweet potato, cut into chunks
1 small head of broccoli, cut into florets
4-5 Portobellini mushrooms, cut into quarters
1-2 tbsp. cooking oil (canola or sunflower), for baking
1 candy beetroot, thinly sliced
40g of red cabbage, thinly sliced
1 ripe mango cheek, thinly sliced
Handful of rocket
Handful of coriander
Drizzle of Sriracha
Black sesame seeds, for garnish
Salt, to taste
Pepper, to taste

For the sauce:
100ml smooth, unsweetened (natural) peanut butter
150ml Coconut milk
2 cm piece of fresh ginger, finely grated
1 medium clove of garlic, finely grated
1 tbsp. ketjap (Indonesian sweet soy sauce)
1,5 tbsp. Soy sauce/tamari
Juice from 1 lime
1 tsp. Sriracha/hot sauce
Salt, to taste
Black pepper, to taste
1/4 tsp. of ground coriander
1/4 tsp. of ground cumin
½ tsp. palm sugar, finely grated


Method

Preheat oven to 190C. Place the sweet potato, broccoli and mushrooms in a bowl, add the oil, salt and pepper and arrange on a baking sheet. Place the baking sheet in the oven. Remove the mushrooms and broccoli after 10-15 minutes, when slightly golden and soft. Turn the sweet potatoes and continue cooking for another 5-10 minutes. Remove from oven and arrange in serving bowls. Top with the rocket, beetroot slices, mango and coriander. Drizzle with Sriracha and sprinkle sesame seeds over. 

To make the sauce, combine all the ingredients in the bowl of a blender and blend until smooth. Taste and adjust seasoning. Place a couple of spoonfuls in the serving bowls. Enjoy!

DOUBLE CHOCOLATE OREO BROWNIES

Brownies are awesome. Vegan, double chocolate Oreo brownies are even better.

I'm not a big baker - I tend to get bored along the way, just wanting to eat a piece of the cake already without putting in much effort. That's why if the ingredients list is too long for a recipe I just find another one. And although I do admit that every ingredient (in that long list) has it's place, I find an immense pleasure in creating recipes with only a few ingredients at hand (those which I always have at home). Even though this recipe is does not particularly fall into that category with things like dates and Oreos which I don't usually keep in my pantry, it is still a no fuss, easy recipe. Not to mention that they are incredibly delicious and utterly satisfying.

These brownies are an absolute treat for any occasion, whether its just you filling up a Sunday by baking or preparing for a party. They are a real showstopper!


Ingredients

75g fresh Medjool dates

250g organic, unbleached cake flour

1,5 tsp baking powder

40g cocoa powder

30g organic brown sugar

80 ml coconut oil, melted

1 ripe banana

240 ml almond milk

4 Oreo cookies, crushed

40 g dark chocolate, chopped


Recipe

Preheat oven to 180C. Line a square baking dish with baking paper.

Chop the dates and place in a blender with the almond milk, banana and a pinch of salt. Blend until smooth. Move to a bowl and stir in the oconut oil. 

Mix together the flour, sugar baking powder and cocoa powder.  Combine the two bowls by folding the liquid into the dry ingredients. The mixture should be quite thick, if it seems still a bit too thick/dry add some almond milk. 

Pour the batter into the prepared baking dish and top with crushed Oreos and chocolate chunks. Bake for 25 minutes or until a toothpick inserted comes out clean. Cool completely before cutting.

Enjoy!

CILANTRO CASHEW CREAM CHEESE JALAPENO POPPERS with a peanut satay dipping sauce

Many would agree that chilli poppers are arguably one of the best foods in the world. There's something about the spiciness of a jalapeño, the melty cheese and the flavourful dipping sauce that makes this dish one of the most satisfying little bites.

And here it is now, veganised. I'm sure this recipe is pretty easy make gluten-free as well if you sub the flour and breadcrumbs for gluten-free options. It is very most definitely worth a try. 


Ingredients

250g raw cashews, soaked overnight

2 tbsp nutritional yeast

15 ml water

1/2 tsp salt, more if needed

1/4 tsp smoked paprika

1/4 tsp ground coriander

juice from 1 lemon

handful of cilantro


50g grated vegan melty cheese

6 large jalapeno peppers, 8 small ones


150g breadcrumbs

1 tbsp all purpose flour + more for coating

125 ml unsweetened plant-based milk

3 tbsp coconut oil (or any other cooking oil), for brushing


For the sauce:

100ml smooth, unsweetened (natural) peanut butter

150ml Coconut milk

2 cm 2 piece of fresh ginger, finely grated

1 medium clove of garlic, finely grated

1 tbsp ketjap (Indonesian sweet soy sauce)

1,5 tbsp Soy sauce/tamari

Lime juice from 1 lime

1 tsp Sriracha/hot sauce

Salt, to taste

Tellicherry pepper, a generous amount

1/4 tsp of ground coriander

1/4 tsp of ground cumin

½ tsp palm sugar, finely grated


Method

Preheat oven to 200C.

To make the cashew cream cheese, place the soaked cashews, nutritional yeast, cilantro, lemon juice, spices and water in a blender and blend until completely smooth (this may take a while depending on the strength of your blender). Season with salt and pepper, then mix through the grated vegan cheese. 

Cut the jalapeños open from the top and remove the seeds. Alternatively, you can cut the peppers open from the side. Fill the peppers with the cheese mixture and leave aside.

Prepare a simple batter by mixing together the tbsp of flour and plant-based milk. Now coat the jalapeños first in flour mixed with a pinch of salt, then in the batter and then in breadcrumbs. I did a double-coating to get an extra crispy crust. When ready, place in a single layer on a baking sheet and brush with oil. Bake for 15-20 minutes until slightly browned and crispy. 

For the dipping sauce, combine all the ingredients in the bowl of a blender and blend until smooth. Taste and adjust seasoning. Enjoy!